When it comes to analysing the performance of your website, data is king, queen and prince regent. Thanks to Google Analytics (GA), there is no excuse not to track and analyse your website traffic. With GA you can access and analyse a whole tranche of metrics including traffic sources, bounce rate, time spent on page, pages per session and conversions but, for the small business owner, it can be awfully confusing. To cut through the confusion, and help you make the most of what GA has to offer, we’ve put together this list of 5 awesome tips.
Set up your goals
Setting up goals on your GA is something that’s really easy to do but is often overlooked by the majority of users. Once you’ve installed the tracking code provided by GA on your website, your immediate next step should be to set up goals in GA itself. These goals will form the basis of all your website analytics, because these goals and conversion rates are ultimately your business goals.
Track Your Events
Part and parcel of setting up your goals is Event Tracking. Using a tiny amount of extra code, you can begin collecting data on a load of extra activities that can’t be tracked with the regular GA code. You can track things that do not have a dedicated thank you or follow up page, like button clicks.
The way event tracking works is by passing the following information through to Google Analytics:
Catergory, Action, Label and Value
These values are used to help identify your events and they represent:
- Category – This element is used to identify what you want to track, like eBook download, video, signup form, ads etc
- Action – This is used to define the interaction of your visitor and can be: click, button, play, stop.
- Label – Used to identify the type of event that’s tracked
- Value – Used to help you specify a value for your event that can be used when you set up a goal for your event.
The basic code for event tracking looks just like this:
_trackEvent(category, action, opt_label, opt_value, opt_noninteraction)
You then replace each aspect with the data that you want to be reported. Bear in mind that you only need to include category and action, all the others are optional. Once you have set up your links, all you have to do then is set up that event as a goal, using the Category, Action, Label and Value conditions as a goal.
Sync with Google Search Console (webmaster tools)
For the uninitiated, Webmaster Tools (now officially rebranded as Google Search Console) is another free application from Google which allows users to check the indexing status and optimise the visibility of their website(s).
By connecting your Search Console property (website) with your GA account, you gain full access to Google’s new Search Engine Optimisation reports.
These come in three forms: Queries, Landing Pages and Geographical Summary. As well as helping you discover your top performing search queries and landing pages, the data can also be used to identify:
- Keywords that have a low click through rate, but high average position. Once you know what these are you can change the meta title and description of your page to improve their CTR.
- Landing pages that have a good click through rate, but low average position. These pages can then be put through an on-page optimisation process to improve their rankings.
- What are the countries your organic visitors are browsing from.
Stop Tracking Yourself
Do you and your colleagues have your website set as their home page, or do you visit to test and update content? Of course you do. But did you know that your visits could be skewing your analytics data have a negative impact on your data.
To prevent this happening and to exclude yourself and your co-workers from your Analytics data you will need to set up a filter under the Admin panel. If you have a static IP address, go to All Filters > Add New Filter and set a Predefined Filter to exclude traffic from your given IP address. If you don’t know your IP address just google ‘what’s my IP.’ Be aware, though, this will ONLY work if you have a static IP (most business broadband packages come with a static IP these days).
Set Up Custom Alerts
Let’s face it, unless you have a dedicated marketing or website maintenance team within your organisation, you’re not going to have the time needed to check your GA account every day for unusual activity but, thankfully, you don’t have to.
GA comes ready loaded with the option to set up Custom Alerts that trigger every time a specific condition is met. These custom alerts can be configured to send you an SMS or email whenever the conditions of the alert are met.
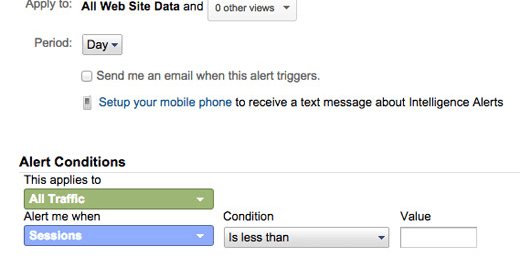
To create a custom alert, simply click the Manage Customized Alerts button in the Custom Alerts section of the Intelligence Events tab, located at the top of the right-hand menu bar in GA. Once you’re in Manage Customized Alerts tab, just click + New Alert and you will be presented with this screen:

As seen above you can apply the alert to all of your traffic or just a segment of that traffic (more on this later), but be aware that, just because you can create alerts to cover every possible anomaly in your web traffic doesn’t mean you should.
Instead, you should be selective. There are hundreds of different permutations for custom alerts and the types you set up should be aligned with your marketing goals. To help guide you through setting up custom alerts, we’ve provided three examples.
1) Spike in Traffic
For obvious reasons, you will want to know right away if you get a press mention or if an influencer posts one of your blogs to twitter, and setting up a custom alert to watch for traffic spikes are the perfect way to do so. If one of your main business objectives is building buzz and brand awareness, then having a traffic spike custom alert set up should be first on the list of your priorities.
Here’s what the configuration should look like:
- Period: Day
- This applies to: All Traffic
- Alert me when: Sessions
- Condition: % increases by more than
- Value 20% – 50% (Although you should choose a % that’s right for you based on the consistency of your site traffic)
- Compared to: Same day in the previous week
2) Spike (and drop) in Goal Completions
You should also configure alerts for sudden spikes in completion of your goals (see above for a bit more about this), which could mean that a piece of your content is doing exceptionally well, or that you’ve received a targeted mention in the trade press.
The configuration should look like this:
- Period: Day
- This applies to: All Traffic
- Alert me when: (select your goal – We advise that you create an alert for each of your top three goals)
- Condition: % increases by more than
- Value: 15% (as above this should be based on the consistency of your previous goal completions)
- Compared to: Same day in the previous week
You should also be setting up alerts for a sudden drop in goal completions, which could indicate that there is a problem in your sales funnel, like a broken landing page or form. The configuration looks exactly like the Spike in Goal Completions, displayed above, but instead select the “% decreases” option under Condition.
3) No traffic
A really important alert to have, as this will notify you when there’s a serious error with your site, or if there’s a glitch between your site and its GA. Either way, you’ll want to know ASAP. The configuration for this is very simple, and looks like:
- Period: Day
- This applies to: All Traffic
- Alert me when: Sessions
- Conditions: Is less than
- Value: 1
Frankly, that list is by no means exhaustive, and neither is this article. There’s no end the possible combinations of custom alerts and the same is true for ways to optimise your Google Analytics.
If you want to make the most of your Google Analytics, then you’re in the right place. With over a decade of experience in delivering industry-leading web solutions, we can make the most of your digital presence.
Image credits:
- https://blog.kissmetrics.com/wp-content/uploads/2014/09/create-custom-alert.jpg
(16)
Report Post


