Did you know that transcribing audio and video content can directly improve SEO? I’m talking about all those podcasts, webinars, and videos that you must be putting out on the regular. It turns out, when you transcribe these media and post them alongside your content, you get some quick SEO benefits.
The search engine giant’s Webmaster Trends Analyst John Mueller confirmed as much when he said that providing transcripts will improve the indexing and searchability of audiovisual content.
Benefits Of Transcribing Multimedia Content: From SEO to Beyond
SEO benefits aside, transcripts also improve accessibility, especially for users with poor internet and can’t properly load the audiovisual content, or users with hearing or visual problems. You can even repurpose transcripts into other types of material, such as new articles, slide presentations, or social media posts.
Still, some webmasters neglect to put out transcripts for their multimedia content for one reason or another; mostly, they point to the understandable reason of budget and time constraints.
But when Google says that transcriptions can directly improve your SEO, you listen.
Some cases in point:
- After transcribing all their audio content, the radio show This American Life (TAL) found that 6.68% of search traffic is attributable to transcripts.
As it turns out, of all the unique visitors of TAL who found their site through search, a portion of those had landed on a transcript page. The transcript pages also contributed to a 4.36% increase in inbound traffic and a 3.89% increase in inbound links.
- Two more studies found that pages that added transcripts earned on average 16% more revenue than those without; meanwhile, Youtube videos that added captions gained 7.32% more views overall.
So from this, we can all agree: transcription is not just a nice-to-have—it is a valid SEO tactic.
And now this brings us to the heart of this article: How can you transcribe within budget?
Let us count the ways.
Automated, Manual, And DIY Transcription Processes
There are three primary processes to transcribe audio and video: automated, manual, and Do-It-Yourself (DIY).
Automated Transcription
Automated transcription tools include audio or speech-to-text recognition technology, transcription software, and Application Programming Interfaces, or APIs for transcription.
In a nutshell, what these technologies promise to do is automatically produce text from audio.
Presently, however, these tools can’t yet deliver 100% accuracy and still need human intervention to produce usable results. If you try Youtube’s real-time captioning settings, you’ll see what I mean.
For example, most inaccuracies in automated transcriptions can be caused by heavy accents, mispronunciation, inaudible speech, background noise, overlapping sounds, dialect, and slang. In these cases, a professional transcriptionist must still go through the text to clean it up for things a software just can’t understand.
As technologies improve, we might see better tools come up. But if you have a tool that can produce automated transcriptions with at least 80% to 96% accuracy, then that’s definitely a lot of time saved, even if you have to clean it up afterward.
Manual Transcription
Manual transcription, on the other hand, is when a human does all the transcription work without the aid of any software. This usually means typing everything out as you hear it and the only tool you’ll need is a text editor.
Accuracy for manual transcriptions used to be typically higher. However, state-of-the-art tools that use machine learning, AI, and segmentation techniques can now produce transcriptions with roughly the same error rate as humans can.
DIY Transcription
Companies usually divide the work between two or more people to finish transcription projects faster. For example, an hour-long podcast that needs to be transcribed and delivered in one day can be done simultaneously by four people with 25-minute segments each.
However, in situations where you can’t just saddle four people in your team with a single project or you simply can’t afford it, there is such a thing as a do-it-yourself transcription.
Apparently, this means you will have to do all the work yourself.
Whether you’ll be relying on one process or a combination of these will depend on your current situation and resources.
In any case, below is a list I gathered of eight ways that you can transcribe your audio and video content.
8 Ways To Transcribe Audio & Video Content For Quick Seo Benefits
1. Free Online Transcription Tools
One Way To Transcribe Audio Clips or video recordings is to use free online transcription tools.
These are easy to find as you can simply Google “free online transcription tools” and you’ll be swimming in a myriad of choices, such as oTranscribe, Trint, and Speechlogger, among others.
Google Docs also comes with its own free, online transcription system called Google Voice Typing.
To access, just go to Google Docs > Tools > Voice Typing or simply hit Ctrl + Shift + S.

Below is a test I did, using a common poem and a general conversation script.
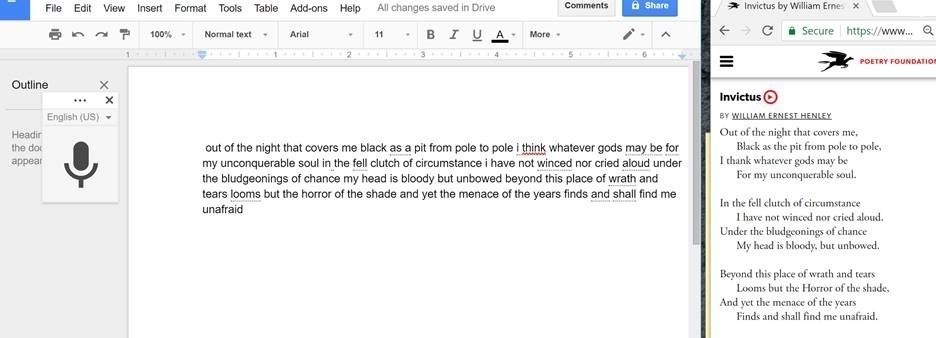
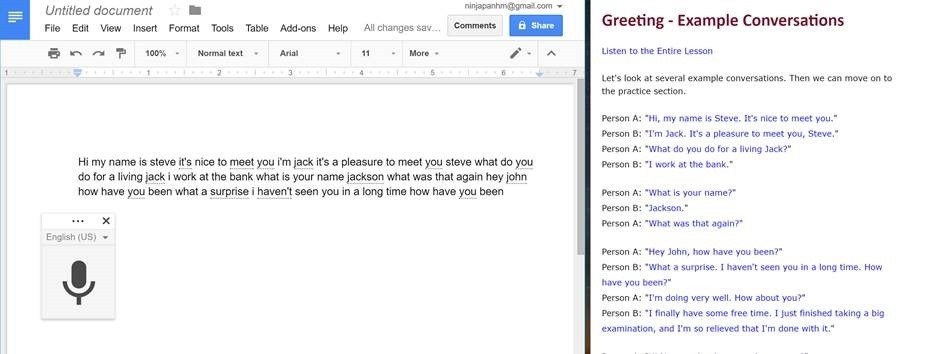
As you can see, it’s almost at a hundred percent accuracy.
But this is only when you speak as slowly and clearly as you can.
In most other cases where you have no control of your speakers, these free online transcription tools can still be riddled with limitations. So these apps may work best when you’re the one dictating, but can then fail spectacularly when you try to use it on recorded audio.
So a word of caution: always proofread any transcribed text, especially auto-generated ones.
Why is this important?
Not only did Google specify in their guidelines to avoid “automatically generated content,” but they also have strict penalties for any content they deem as “spammy.” And yes, poorly made transcriptions (especially the auto-generated kind which, unedited, can be quite off-kilter) may be tagged as spam—even if you used Google’s own Voice Typing software to concoct them.
Another thing to note: online transcription tools need you to be connected to the Internet the whole time you’re using them; so if you’re an on-the-go freelancer who typically has connectivity issues, that’s something to think about when deciding what to use.
2. Free Desktop Transcription Software
These tools are basically the same as number one. The main difference is, you can download and install these tools on your computer so you can work even with no internet.
Some examples of free desktop transcription software are Transcriber, Express Scribe, and MacSpeechScribe.
3. Use Youtube’s Automatic Captioning
Now I know I did say Youtube’s automatic captioning can at times be disappointing.
Here’s a classic example of Youtube captioning at work, via Variety.com.


It’s a pretty embarrassing mistake. And if you’re a business owner, you don’t want those kinds of errors to turn your company into a laughingstock.
However, for some videos that have good, clear audio, a speaker with a well-modulated voice, perfect pronunciation, neutral accent, and moderate talking speed, the accuracy is actually pretty good.
You can also source subtitles and captions from the Youtube community by turning on the community contributions settings. Here is Youtube’s official tutorial on how to do that:
And here is how users can contribute captions to your video:
Obviously, you won’t get lucky with a perfect audio setting and speaker all the time. There are situations when you’ll need to transcribe events such as interviews or conventions, and these events always have a lot of background noise and live Q&As with overlapping audio.
For these cases, it’s probably best to use other methods.
However, for one-on-one tutorials where you can have more control over the presentation, Youtube auto-captioning just might work.
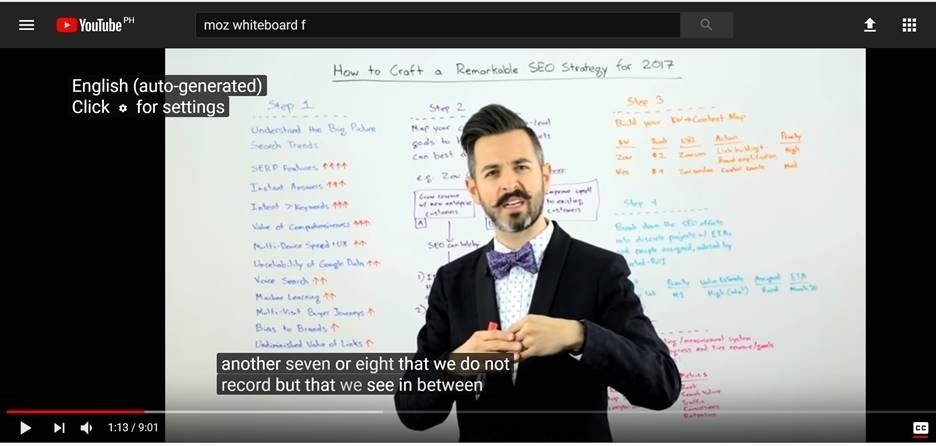
For example, I tried Youtube’s auto-captioning on one of Rand Fishkin’s Whiteboard Friday episodes, and it worked perfectly fine with only minimal errors.
5. Maximize Your Gadgets
There are a ton of apps on Android and Apple Store that can help you transcribe using your mobile gadgets. Just pop your app store open and search for something like “voice to text transcription.”
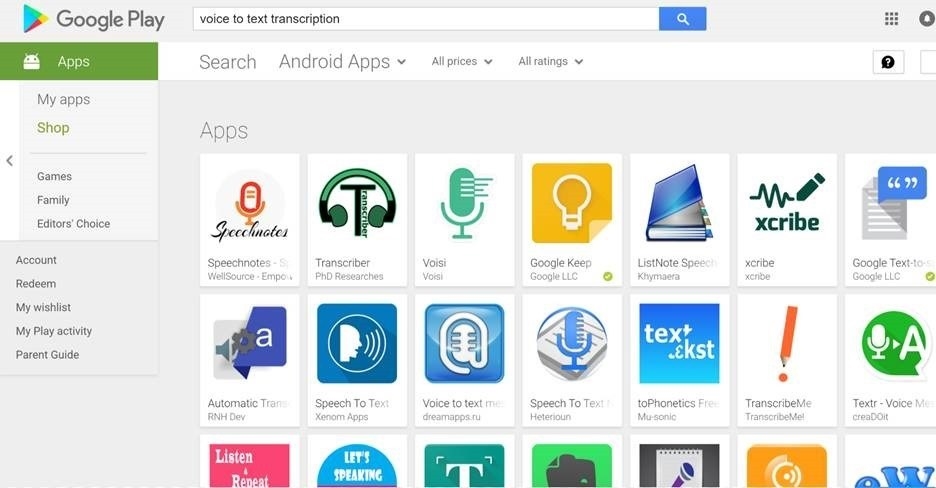
Mobile transcription apps work best for journalists or freelancers who are always on the move and frequently doing in-person interviews or field reports.
Additionally, most modern smartphones and computers also come with their own speech-to-text recognition technology.
In a typical smartphone, you can open up a built-in notepad app and press the microphone icon, which powers up the phone’s speech recognition software. Once you start dictating, the phone’s system translates your speech into text and displays it on the notepad.
Microsoft and Mac both have built-in speech recognition software known as, respectively, Windows Speech Recognition and Dictation.
To access Microsoft’s tool, simply go to the Windows search bar and type “Windows Speech Recognition.”
Once it’s on, you can open your text editor and place the cursor where you want your dictated text to appear.
Recently, Microsoft announced that their speech recognition system had achieved a 5.1% error rate, which is supposedly the same error rate of humans.
Now I’m not sure if my version is up to date, but I’m on Microsoft, I tried doing some transcription tests, and here’s how those turned out.
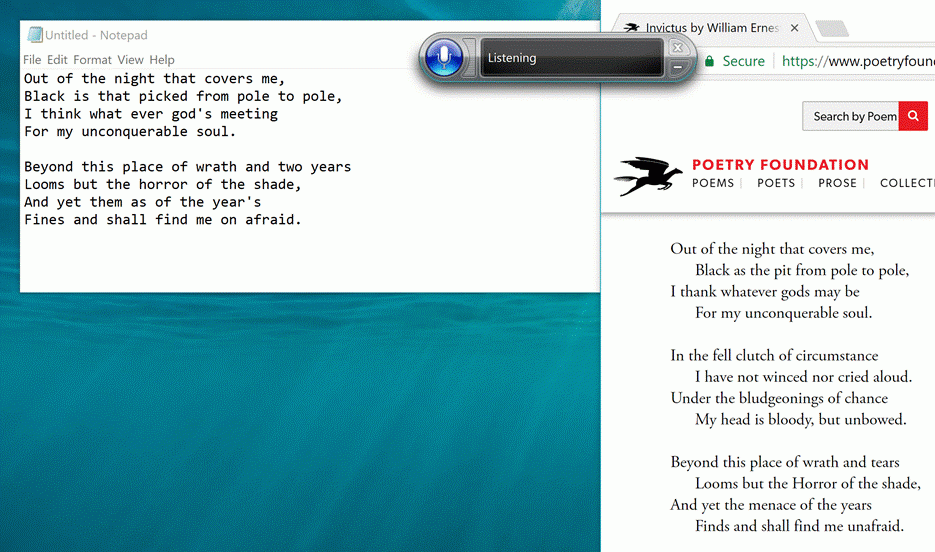
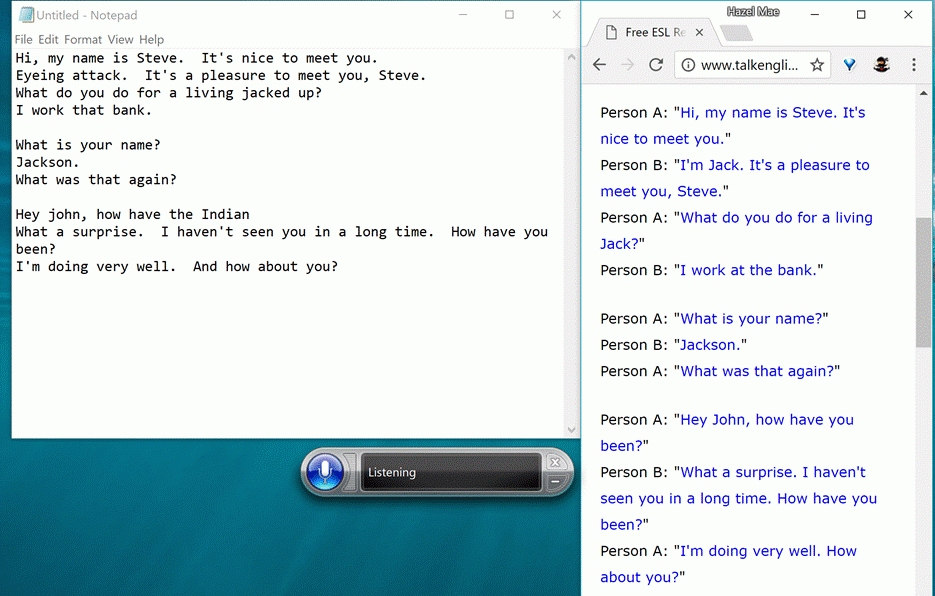
The results are not stellar, but they’re not bad either. As I’ve mentioned, nothing a round of proofreading can’t fix.
As for Mac’s dictation, I couldn’t test it because I don’t run on Mac, but users can set it up by going to:
Apple menu > System Preferences > Keyboard > Dictation
From here, you can turn on Dictation and fill in the rest of the needed information, such as language preferences and keyboard shortcut.
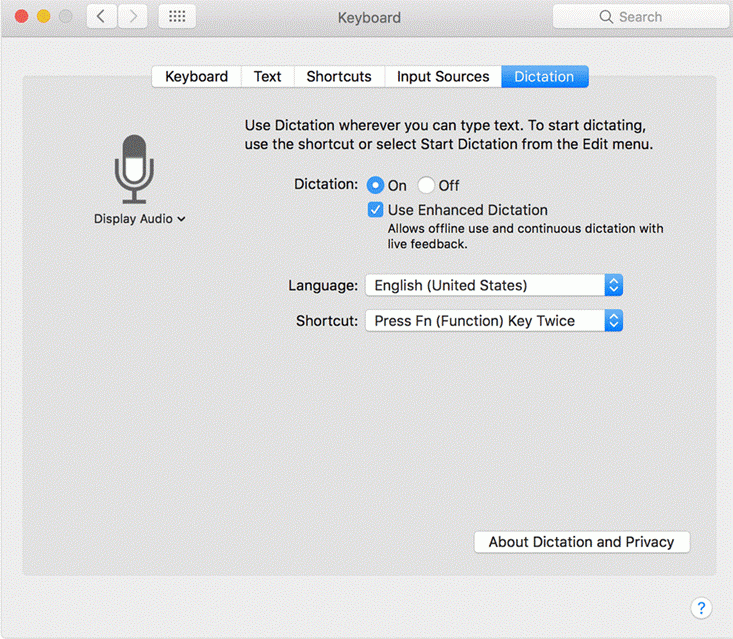
Once it’s set up, the rest of the process is basically the same. You open your text editor, set the cursor to where you want your text to be, and start dictating.
Windows’ software can function without an internet connection, while for Mac, you’d have to choose the Enhanced Dictation option because the default speech recognition program needs internet to run.
6. Google Cloud Speech API
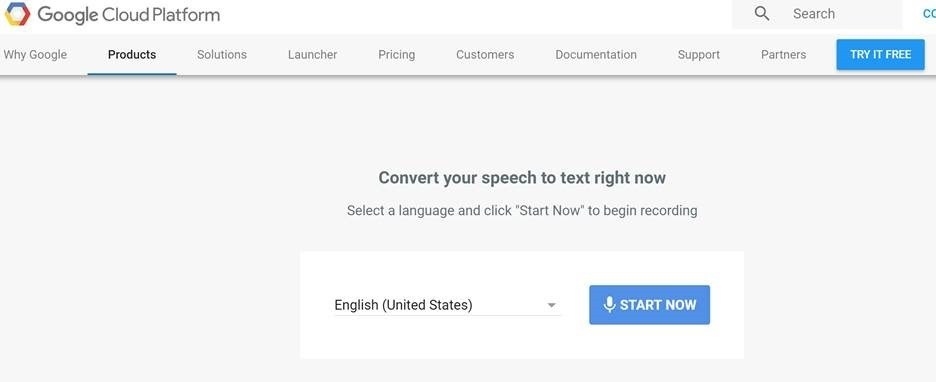
One of the most powerful free speech recognition APIs is Google’s Cloud Speech API, which recognizes over 110 languages and has a lot of advanced features.
As you can see from the test I’ve done below, this one also has close to 100% accuracy.
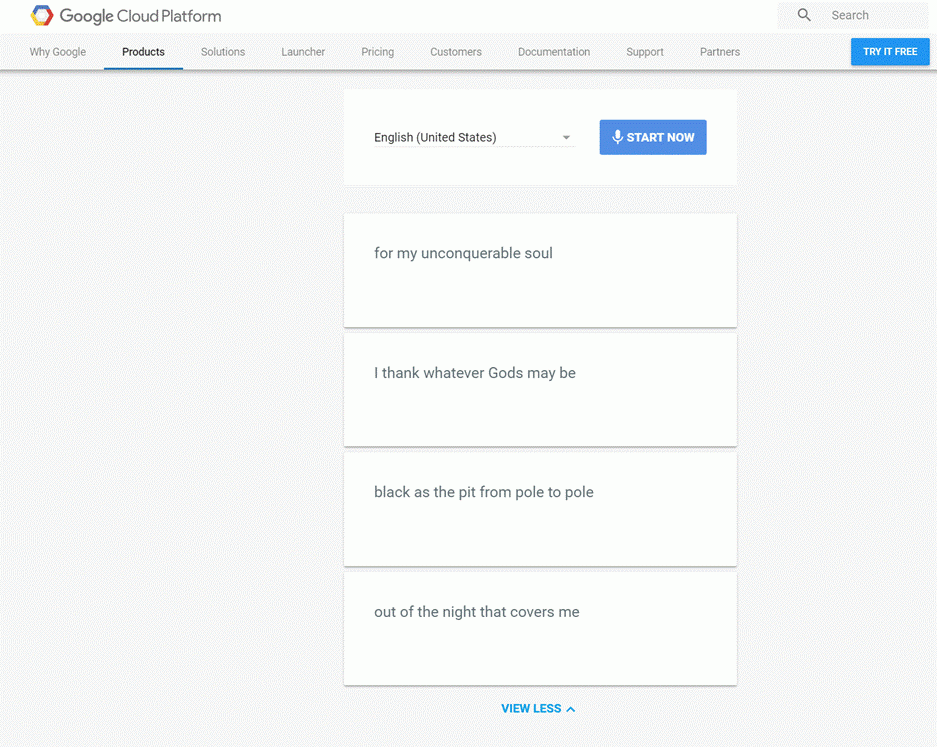
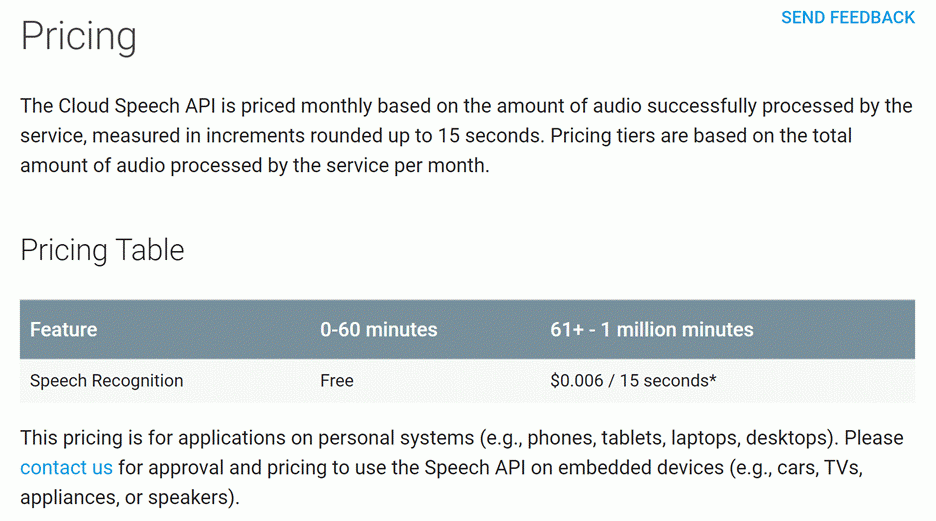
However, it does not come free after an hour’s worth of audio transcribed.
Pricing info is as follows:
7. Hire Help Or Do It Yourself
As you will probably find out, the most effective transcription tools don’t come cheap. Most of the advanced ones can range from $50 to $150 a pop—and this is a conservative estimate, as some apps, like Nuance, can cost higher than $500.
Professional transcription companies may rightly need to invest in the best stuff, but if you’re a digital marketer who just needs to transcribe your podcasts and tutorials, then manual transcriptions can be a cheaper alternative.
You can also opt to hire a freelance transcriptionist in online job platforms such as Upwork and Fiverr. Transcription services on these platforms can range between $5 to $30 for a 10- to 60-minute audio project.
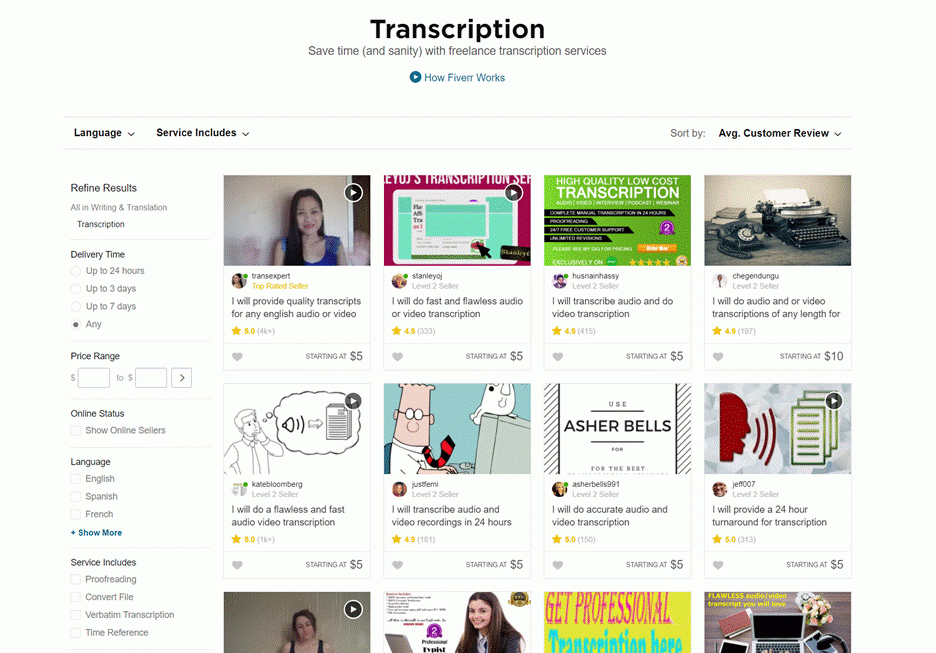
You can click on the freelancer profile, screen, and check out his or her credentials, background,
and track record to ensure that he or she can deliver the job. Another advantage of this type of transcription is that you can directly communicate, and give instructions and feedback to these freelancers.
If you need to transcribe confidential or large volumes of recordings, you can go to a professional transcription company instead.
There is no official study documenting global average transcription prices per audio hour worked. But if you look at most companies’ basic transcription rates, you can see that they charge, on average, less than $3 per audio hour, while other companies charge between 9 to 15 cents per line transcribed.
If your budget still cannot accommodate the previous options, you can always just get a VLC player, open up a text editor, and transcribe everything yourself.
Taking the DIY route entails less to no financial cost, but can be time-consuming on your part. So before deciding to do it alone, always check if a cheap but effective option is available online.
Conclusion
So there you have it!
These are just some of the ways that you can transcribe audio and video content. Again, always remember to check the accuracy and readability of your transcriptions so you can reap the SEO benefits without getting marked as spam.
Of course, it’s still up to you to decide what method best fits your needs and budget, so let us know if we missed anything in the comments below!
* Adapted lead image: Public Domain, pixabay.com via getstencil.com
The post 7 Ways To Transcribe Audio & Video Content For Quick SEO Benefits appeared first on Search Engine People Blog.
(84)
Report Post
