Creating goals is important for anything in life and is especially important to the success of your online efforts. They help you remain focused and accountable to your progress. In this article, we’ll explain how to create a Google Goal so you can start tracking how well your site fulfils your target objectives.
*Creating a Google Goal requires you to have Google Analytics installed on your website. If you have not installed an Analytics code on your site, read our article “Setting up Google Analytics Tracking” to learn how to activate Google Analytics.
How to Create a Goal
- Sign into your Analytics account.
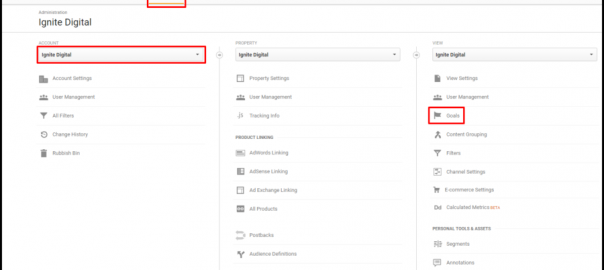
- Click on the Admin tab.
- Choose a desired website/property in the dropdown below the Account column.
- Under the View column, click Goals.

- Click +New Goal to create a new goal. Enter a name for your Goal and select a Goal slot ID.

Next, you will have to decide what type of Goal you would like to set up for your website. Below we’ll explain how to create a Destination Goal and an Event Goal.
How to Create a Destination Goal
A Destination Goal is a type of goal designed to treat a pageview or screen view as a conversion. You will specify a URL on your site, typically a thank-you page, that will be counted as a goal completion or a conversion.
- Choose Destination goal and click Continue.
- Select Equal to (you have the option to select match types, Begin with or Regular expression) and insert the URL for the page you would like to track. (Ex. /thankyou.html)

- You can choose to enter a Value if you know a dollar amount that this conversion would generate.
- Funnel refers to the path a user takes to reach your chosen destination page. By turning this toggle on you can specify the screens or pages the user must visit prior to reaching your final Destination Page/Goal.
- You can then click Verify this Goal if you would like to see how the goal would have performed in the data from the past 7 days from your website.
- Click Save and you now have a Destination Goal implemented on your website!
How to Create an Event Goal
An Event Goal is a type of goal that tracks an action such as a social recommendation, video play or an ad click.
- Choose Event Goal and click Continue.
- You will then have to fill in four conditions for your event goal.
- Category is a name that you supply as a way to group objects that you want to track. For example, you want to track how many times a video is downloaded. Your category name may be “Videos”.
- Action is typically used to name a type of event or interaction you want to track for a particular web object. For example, your tracking the video download, your action might be “Play”, “Stop”, or “Pause”. The action names should be relevant to your report data.
- Label allows you to provide additional information for events you want to track. For example, you may want to use the title of your video as the label.
- Value is different from the other components as you can enter a numerical value to a tracked page object. For example, you can use it to provide a dollar value when the video is downloaded.

- Category is a name that you supply as a way to group objects that you want to track. For example, you want to track how many times a video is downloaded. Your category name may be “Videos”.
- Once you’ve filled out each condition, click Verify this Goal if you would like to see how the goal would have performed in the data from the past 7 days from your website.
- Click Save and you now have an Event Goal implemented on your website!
By selecting and saving a goal on your website, you are one step closer to becoming an expert when it comes to your website traffic and your customers overall. Congratulations!
Business & Finance Articles on Business 2 Community(57)
Report Post


