In my previous blog post “Guide to Setting Up Email Workflows for Webinars,” I mentioned that smart content is a great idea if you want to target your follow-up emails to multiple segments without creating multiple if/then statements in a very complicated workflow. This blog post will cover how exactly to create those smart emails for both those who are using GoToWebinar and those who are using a different product.
Step 1: Segment Your Audience and Write the Emails
I covered this in the previous post, so just a quick note here. Prior to doing any work in HubSpot, decide how you want to customize the webinar follow-up email. To demonstrate in this post, we’ll have four types of email:
- Customers and Opportunities who attended the webinar
- MQLs and SQLs who attended the webinar
- Leads who attended the webinar
- All contacts who registered but didn’t attend the webinar
For example, here is what those four emails might look like:
1. Customers and Opportunities who attended the webinar
Hello {(contact.firstname}},
Thanks for attending our webinar, “Title of Webinar.” We hope you enjoyed it! If your question wasn’t answered during the live event, we plan to get back to you within the next day or two.
You can access the slides and recording here.
Please feel free to also pass these along to colleagues you know who may be interested.
Thanks again,
Jessica
2. MQLs and SQLs who attended the webinar
Hello {(contact.firstname}},
Thanks for attending our webinar, “Title of Webinar.” We hope you enjoyed it! If your question wasn’t answered during the live event, we plan to get back to you within the next or two.
You can access the slides and recording here.
I’d like to set up a call to see what you thought about the event and the industry in general. Does next week work for you?
Thanks again,
Jessica
3. Leads who attended the webinar
Hello {(contact.firstname}},
Thanks for attending our webinar, “Title of Webinar.” We hope you enjoyed it! If your question wasn’t answered during the live event, we plan to get back to you within the next or two.
You can access the slides and recording here.
We also invite you to fill out this survey to let us know what you thought about the event and what topics we should cover in the future.
Thanks again,
Jessica
4. All contacts who registered but didn’t attend the webinar
Hello {(contact.firstname}},
According to our system, you weren’t able to make it to our webinar today, “Title of Webinar.” We are sorry we missed you!
If you are still interested, you can access the slides and recording here.
Please feel free to also pass these along to colleagues you know who may be interested.
Thanks again,
Jessica
(Note on this last email: The form to access the recording should be smart as well so that leads will have to answer qualifying questions to access the recording whereas customers just have to input their email address.)
Okay, now we are ready to go!
Step 2: If You Are Using GoToWebinar – Create Your Lists
Note: You can do this prior to the webinar taking place, which is nice. They will just be empty until the event is over.
To make your emails smart based on webinar status, you’ll first want to create a Smart list. I’ll first make a list for my first segment (“Customers and Opportunities who attended the webinar”). Under “Segment contacts by…”, select “GoToWebinar webinar status” and then choose “Attended” and pick your webinar.

Image from HubSpot.
You’ll then want to add “and…” criteria and choose Lifecycle Stage as equal to Customer or Opportunity. Name and Save your list, and you are done with the first one.
You’ll repeat this process for lists #2 and #3 with other Lifecycle Stages as appropriate.
For the last list, you’ll want two criteria: Contact has registered for your webinar and Contact has not attended your webinar. (Otherwise you’ll get everyone who didn’t attend, including people who didn’t register.)

Image from HubSpot.
Step 2: If You Are Using a Different Product – Import Your Lists
For other products without native integration with HubSpot, you’ll need to import a list or lists in CSV format after the webinar is over. (Contacts > Lists > Import button at top right)
There are two ways to do this:
- The first way is to have new column for the contact’s webinar status (attended or didn’t attend). You’ll import this column as a new Contact Field in HubSpot and will have to create a new field every time you have a new webinar if you want to keep statistics and cross-reference who attended what later.
- The other way to do it is to break your list into two files: one for those who attended and one for those who didn’t. When you import each list, name it appropriately, and then you can reference the correct static list at any point in the future. (When you import a file, a Static List is created in HubSpot automatically.)
Which method you choose is up to you, but I recommend being consistent.
(One note: when importing contacts, HubSpot uses email address for deduplication. Anyone who registered with a different email address will be created as a new contact. This is also true with people who register using the GoToWebinar integration or download any content from your website in general.)
Once you have imported your CSV file(s), you’ll make the four Smart Lists outlined above if you’d like to also segment by Lifecycle Stage. Instead of choosing “GoToWebinar webinar status”, you’ll pick “List membership” and then the static list.
A tip if you want to get everything ready to go before the webinar: create your four Smart Lists named for each of your four segments and with the Lifecycle Stage criteria selected. After the webinar is over, upload your lists, then go back and add the Webinar Status criteria to the Smart Lists prior to sending.
Step 3: Create Your Smart Email
Now that you have written your emails and created the lists, you are ready to create your smart email. (Content > Email > Create new email button at top right)
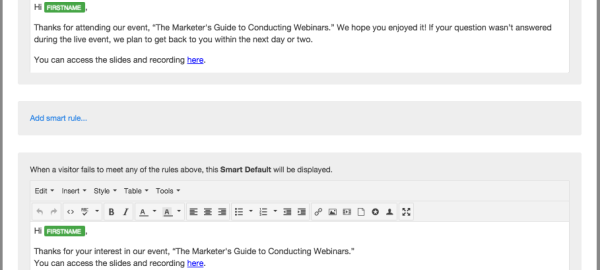
In the main body of the email, paste your default text, which is what people will get if they aren’t in any of our lists (which shouldn’t happen, but just in case):
Hello {(contact.firstname}},
Thanks for your interest in our webinar, “Title of Webinar.”
You can access the slides and recording here.
Please feel free to also pass these along to colleagues you know who may be interested.
Thanks again,
Jessica
(Note: You could logically use the default as one of your four lists; however, I find this more confusing when you are trying to figure out what you did later and how to replicate it for the next webinar.)
After finishing the default email, click elsewhere (to deselect the text box) and then mouse over the body of the email and click on the orange smart button on the top left that appears.

Choose “Contact List Membership” and then find your first segment list. A new dialog box will open with your rule on top (and a blank text box) and the default rule at the bottom. You will then put your email text in the empty box under your first rule.

Click on the blue “Add smart rule…” and choose your second list. Enter the email text for this segment. Repeat for lists 3 and 4. Then click Done.
(A note on Smart Content in HubSpot: it executes from top to bottom in the order your rules are listed. So for each email address, it will check if a person is in the first list and if he/she is, that is the email they will get. If not, it goes on to the second rule. And so forth.)
Finish your email by choosing the person the email is from (this cannot be controlled via Smart Content; if you want different from addresses, you have to create separate emails), Subject Line, Preview Text, Campaign, Email Type, and Web Version.
If you are planning to send this email via a Workflow, choose “Save for automation” under Recipients. If you are planning on sending it by hand, select your four lists on the left under Recipients by clicking the green “Include” button for each.
You can then Send or Save for Automation!
Any tips or tricks you’ve picked up for webinar follow-up emails? We’d love to hear them in the comments below.
Digital & Social Articles on Business 2 Community
(94)
