— July 21, 2018
Did you know there are dedicated Facebook groups for “rat moms” (women who own rats, presumably), people who yell at inanimate objects, and even Nickelback fans?
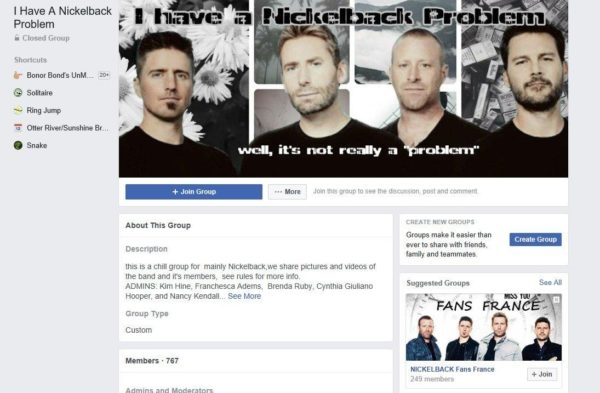
If you use Facebook for personal purposes, you may have taken part in a Facebook group – or perhaps you are more of the silent “lurker” type. Either way, people join Facebook groups for a variety of reasons. Whether it’s a young adult looking to connect with others in a new neighborhood or an entrepreneur looking to build his business portfolio, Facebook groups come in a variety of shapes, sizes, and flavors.
Wait, what is a Facebook Group?
A Facebook group is a page on Facebook created to enable a group of people to interact around a common topic. Oftentimes Facebook groups are used for businesses and organizations to promote and inform their customers and prospects about different products, events, or updates happening in relation to their company or industry.
Facebook groups can be used for a wide array of purposes, but some common ones for businesses include networking purposes, to build customer relationships and develop brand ambassadors, or as a support hub to help customers in need.
It is always good practice to establish a goal before creating your Facebook group. Having a clear set goal and target audience in mind will help you properly configure your Facebook group, starting with the name of the group, and going all the way down to the fine detailed copy. Decisions will need to be made like whether or not you want the group to be private or public, who is going to help manage comments, will the group be targeted towards a specific location, etc.
Overwhelmed? Don’t be! I’ve created this guide to walk you through the set-up process, and I also provide some reasons why doing so will benefit your business in the long run. Let’s start with the set-up process!
How to Create a Facebook Group
Here’s the process in seven easy steps.
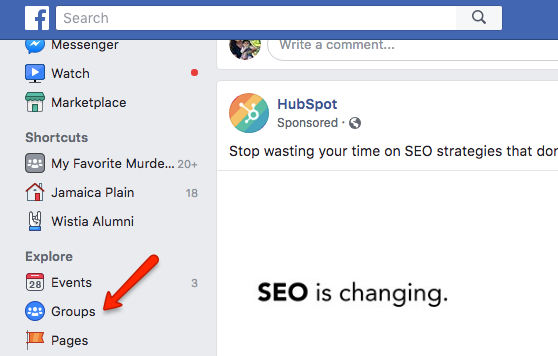
#1: Navigate to the “Groups” button under “Explore” on your Newsfeed page
The first step is going to the “Groups” button (pictured below), which you’ll find to the far left of your newsfeed page when logged into Facebook. Click on that button, and move right along to step number two.
#2: Hit “Create Group” in the top right corner
Once you have completed step number one, you will land on a page with all of your Facebook group information, some pending group invitations, and likely far too many “I lost my phone” groups joined in the early 2000’s. Ignore all the nonsense, and go to the top right hand corner to hit the green button that reads “+ Create Group.”

#3: Choose your group settings
Now the real fun begins! The first thing you will want to do is to customize your groups settings to ensure they are in-line with the purpose and mission of your Facebook group.
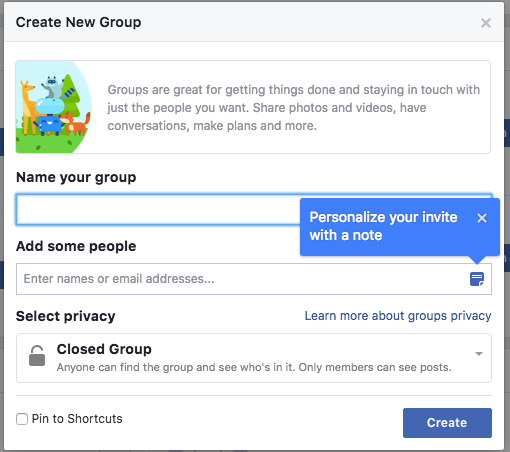
The first few things you will be prompted to do include…
- Name your group
- Invite people
- Select your privacy settings
The name of your Facebook group should be short, sweet, compelling and direct. Don’t attempt to be mysterious here – the name should communicate the content and purpose of your group.
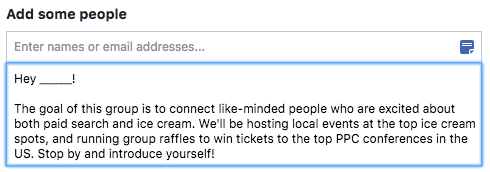
When it comes to inviting people, the best strategy here is to personalize your invite with a short note, which you’ll be prompted to do by Facebook. Providing some context as to why these individuals should join will increase your chances of building a community faster.
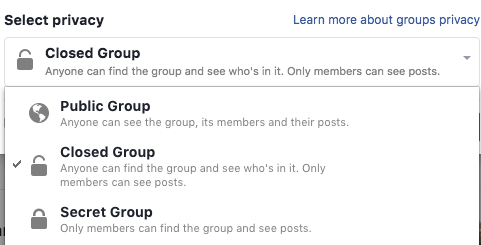
Lastly, chose your privacy settings. Do you want your group to be open and searchable by the public, closed so that anyone can find the group, but only members can post, or secret and very exclusive (aka only members can find and post to the group)?
Obviously, there is a lot to consider when making this decision, but considering your group’s main mission will likely help you determine the best option. For example, if you want your Facebook group to attract leads, you’ll want it to be public. But if it’s for customers only, or if it might contain sensitive information, choose the “Closed” option.
#4: Upload your Facebook group photo
Your Facebook group photo might seem like a minuscule detail, but it is actually one of the most important pieces. In fact, you likely want to skip the invite part of step #3 until you’ve completed this step!
You want to think of your group photo like the cover of a book. It needs to be visually compelling while relating to the group’s purpose. If your group is all about practicing yoga, and you show me an image of someone playing soccer, I’m going to be quite confused.

Take time to choose the perfect picture that is visually engaging and contextually relevant, and make sure it uploads properly to fit the size of the frame.
#5: Edit your group settings
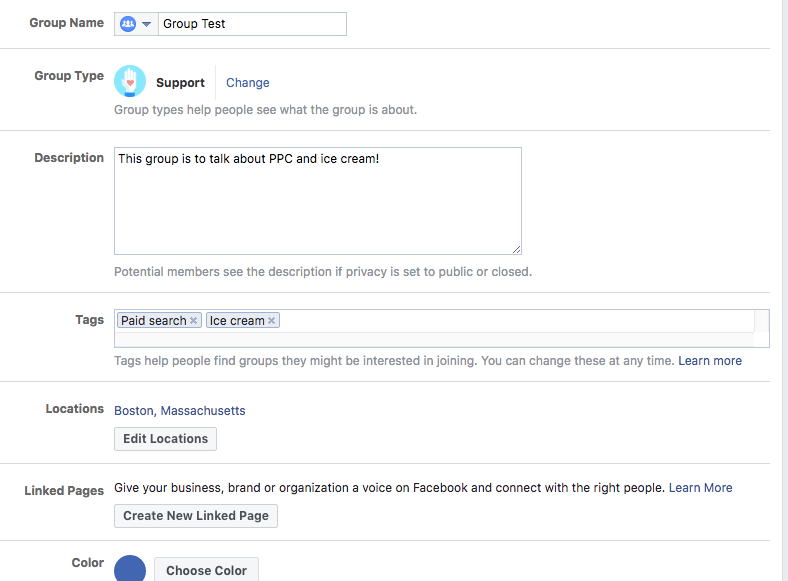
Now that your group is up and running, it’s time to dig even deeper into your settings to ensure your group is configured the way you want. You can do so by navigating to the “…More” section, right below your group photo, and then clicking on “Edit Group Settings.”

Within this section you’ll find many options to further customize your group. A few to pay attention to include:
- Adding a group description
- Selecting a group type
- Adding tags
- Specifying location
Making these customizations will help give group members more context around the way your group operates, as well as help new potential members and leads find your group and join in.
Of course there are many other ways to customize your Facebook group. A few of these include: linking other pages, choosing a group color, customizing your group’s contact information, changing your privacy settings, determining membership approval, and using the “ask a question” option to learn about new group members.
#6: Create your first post! (And make it interactive!)
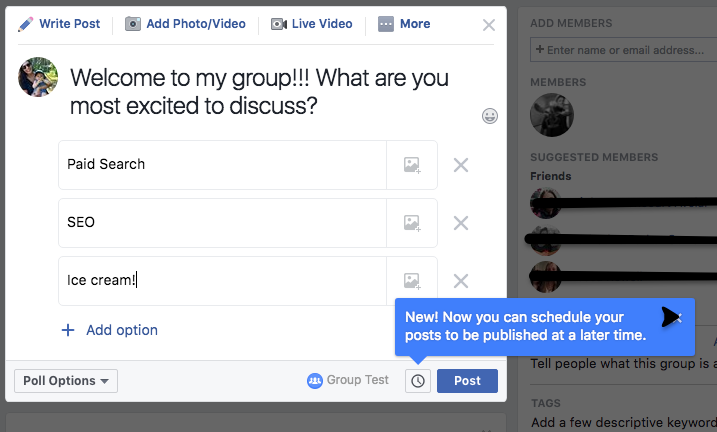
How exciting is this: It’s time to create your very first Facebook group post! The pressure is high because you need this first post to be as engaging as possible. Luckily, Facebook makes that easy with features that allow you to tag friends, ask for recommendations, and my personal favorite, poll your group members.

A great way to start your group off on the right foot is by engaging with your audience, and asking them what they are interested in discussing via a poll. Give it a shot!
#7: Promote your new Facebook group!
Last, but definitely not least, you need to spread the word about your new, cool Facebook group. Facebook gives many options for promoting your group from sharing on your own timeline, sharing in another group, sharing on a friend’s feed, sharing in an event, sharing in a private message, etc. Start spreading the word with these easy-to-use features!
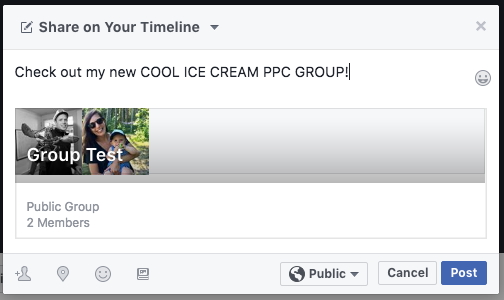
You may even want to take things a step further, and email your colleagues to promote your group to their personal networks. Perhaps you can even run a paid campaign to encourage others to join. Whatever you do, make sure you do something to get the word out there.
5 Benefits to Creating a Facebook Group for Your Business
Now you know how to create a Facebook group. But you may still be wondering, why?
With so many options and locations to build an online presence these days it is important to see the value of each to understand if the time commitment to maintaining your Facebook group is worth the investment. Will there be an ROI? This is the first question marketers always ask.
Here are some helpful benefits that will provide insight to whether or not creating and maintaining your own business Facebook group makes sense for your current business goals.
#1: It Personalizes Your Business & Shows You Care
Maintaining a Facebook group is different then maintaining an Instagram page or Snapchat account because it allows for a higher level of interaction with participants. Facebook groups are designed for high levels of interaction and conversation, so maintaining a platform of this nature helps your business build a sense of community, in turn showing your audience that you truly care about what they have to say.

Being listened to makes people feel that their voices and opinions matter, and who doesn’t want to feel this way? If you can make your customers feel truly heard, then they are going to see you as the obvious superior when comparing your business to your competition.
#2: Learning from Customers & Prospects is the Most Effective Growth Strategy
Giving your customers a voice has so many additional benefits, perhaps the most beneficial being that it can help inform your business strategy and point you in the right direction when deciding what to focus on next.
After working at several companies in the tech world, and having many close friends and family members who have done the same, they all agree that the number one way their companies screw up is when they ignore what their customers and prospects have to say. Acquiring customer feedback and truly listening to your customers and prospects is going to ensure that the decisions made for product development, marketing, and many other areas of the business are what the people want. Giving the people what they want is the only fool-proof way to maintain and fuel your growth.
#3: It Will Build a Strong Business Community
Aside from the benefits of growing your own business, a Facebook group can help connect like-minded people who are interested in the same things. Allowing your audience to develop these relationships on your platform is only going to help them grow, and better reflect on your company as a place they truly respect.
#4: It Allows Your Customers to Learn from Each Other
Allowing your customers to help each other and answer each other’s questions will leave your support team endlessly thanking you. Not only will it free up some time for your customer service staff to focus on other projects, but it will allow your customers to connect and help each other grow. Through exchanging ideas, answering questions, and sharing success stories, having a business Facebook group is an excellent way to make your customers into self-sufficient followers.
#5: Private Facebook Groups Can Turn Happy Customers into Brand Ambassadors
Lastly, a well-run Facebook Group will help turn plain old customers into true brand ambassadors. Building a community, and a place where your audience members can interact and grow, will provide them with a deeper love and appreciation for your brand. This will in turn lead them to spread the word to the world about how wonderful your business is (and we all know what this means… NEW LEADS!).
Are you sold on the idea of running your very own Facebook group? I hope so! We would love to hear how it goes, and how happy your customers are with their new community. Feel free to share your story below!
Digital & Social Articles on Business 2 Community
(96)
Report Post

