Video is a hugely important marketing medium.
- Websites with videos keep site visitors for 88% longer than sites without video content.
- 57% of customers rely on product videos to help inform their purchasing decisions.
Video content is growing in relevance as the amount of visual content online increases, and it’s becoming not just a useful type of content, but a necessity, as more and more customers expect sites to provide video content.
If you’re looking to make use of video to market your brand (and there’s literally no reason why you shouldn’t), it might seem a little daunting at first:
- Most videos online have increasingly decent production value
- A low quality video can damage your brand’s image and reputation.
What’s more, there’s the big issue of time: making quality content requires a lot of man hours, so throwing a video together quickly may feel like a bad idea.
The good news is, video content is nowhere near as complicated as you might think.
- With technology that’s readily available and a small budget, you can create fantastic video content in a couple of hours.
Let’s go through the tips and tricks you’ll need to create killer video content with a high production value that does a great job of selling your brand.
Doing Your Research
As with all content, it’s important to carefully research before you begin production.
This includes:
- Finding out what your customers want out of video content
- Spotting the weaknesses in your conversion experience and planning ways you can use video to plug the gaps.

In addition to this, though, it’s important to do plenty of research into what kinds of video content will work well for your product.
- Watch lots of videos by other companies to get an idea of how your video should look and feel.
- Pay attention to the language of online film – just as relevant terminology and vocabulary are important in text content, editing tools and visuals are important to help your video feel like it belongs.
- In particular you should look at the video content your competitors are making – this will show you the kind of content that does well, but you’ll also be able to differentiate yourself from whatever they’re doing so that your content is unique.
Once you’ve got a feel for online videos and what your customers want, it’s time to start planning your own video content.
Choosing a Direction
There are a lot of brand videos on the internet.
- Many come in different forms – there’s everything from quick whiteboard illustration videos, through to large, big-budget masterpieces that rival the type of content you’d find online.
Most video content falls in between these two extremes.
A good brand video will do three things:
- Humanize your brand
- Show your product in action
- Encourage customers to buy something.
In practice, this isn’t too different to other types of content you might already be creating.

When you’re getting started, the easiest and quickest to produce video involves a piece to camera.
- This is the kind of video that has a single ‘host’ giving a message direct to the audience, talking them through an element of a product and how to use it.
- These videos can be simple, with a plain background (or some greenscreen if you’re feeling ambitious), and don’t cost much to produce.
I’d recommend starting with something simple like this, and once you’ve got the hang of it, branching out to try different kinds of videos with more varied content.
Getting It Done in Two Hours
If you want to complete everything in two hours, I’d recommend breaking things down like this:
- 25 minutes for planning and writing
- 45 minutes for filming
- 25 minutes for editing
- 10 minutes for posting online
- 15 minutes of flexible time for if anything goes wrong.

This setup means getting things done very quickly – and it can be a bit of a rush – but you’re better off leaving as much time for fixing mistakes as possible.
Planning Your Content
In creating your video, you’re going to want to pick a style that works for your brand.
- Ideally, your video content will match the rest of your brand content in tone and style.
- It’s up to you to decide whether your videos are relaxed, professional, or somewhere in between.
- Think about the inclusion of humor or props to spice things up, but only go with these elements if they feel natural – it’ll be clear on camera if something doesn’t quite sit right with your branding.
If you want to get your video completed in two hours, it’s important to fully plan for everything before you even touch the camera.
- Most movies have months of preproduction before they start filming to make sure that everything runs smoothly.
- If you have everything planned in advance, the filming and editing stages will be far less hassle.
At this stage, it’s useful to produce a script for your video, which should include the following elements:
- A brief introduction (possibly with a visual aid)
- A breakdown of your product or the message you want to include
- A call to action.
You may find that the best way to approach these videos is not just to demonstrate your product, but to give informative information about your field.
- You can treat your videos like text content, but with moving pictures.
That said, to start with I’d recommend creating a product demonstration to help you get a feel for making video content.
Getting Your Gear
To make a high quality video, you’re going to need decent equipment.

Don’t get me wrong – there’s no need to invest in an enormous, expensive film studio, but there are a few little things that you ought to pick up that’ll drastically increase the production value of your video.
These include:
- Lighting gear
- A microphone
- A backdrop
These little things will make a huge difference to your videos and will make them look a lot more professional.
A backdrop is relatively simple to either throw up yourself using a sheet or a blank wall, or you can invest in a dedicated backdrop for relatively little.
What Camera Should You Use?
When thinking about equipment, it’s easy to get carried away thinking that you need a luxury, top-of-the-line, expensive camera to get Hollywood-quality video.
- The good news is, this isn’t an expense you need to shell out for.
Considering that your video isn’t going to be blown up to iMax size, you don’t need a hugely expensive camera.

Most DSLR camera are capable of shooting high quality video which will do the job, and they can be bought for as little as around $ 400 – there are plenty of makes and brands around this price or cheaper that’ll be more than adequate for your needs.
- To be honest, though, you don’t even need that – for filming for internet streaming, most simple digital cameras will have enough resolution to provide the kind of quality you need for a simple piece to camera.
In fact, there’s a growing number of digital cameras on smartphones that are able to shoot 4K video, which is more than enough to produce a solid, professional online video.
- There’s a good chance you’ve already got access to a phone or camera that’ll provide all you need in terms of video recording technology.
These cheaper options do come with downsides, but they’re the same roadblocks that you’ll run into with more expensive camera equipment.
Sound and Lighting Challenges
The two big problems you’ll face when it comes to quality recording is:
- Lighting
- Sound
A lot of cameras, even including more expensive options, can only do so much with natural lighting.
- Shadows or poor lighting are a dead giveaway that your video isn’t being recording in a dedicated studio with professional equipment.
Similarly, sound is going to be a real challenge, unless you want to sound like you recorded your video in a cave.
- Because you’re not talking directly into the in-built camera microphone, there’s going to be a lot of background noise and you’ll sound a bit muffled.
- This is particularly a problem for the cheaper camera options – pretty much the biggest difference between large, expensive cameras and cheap ones (apart from video resolution, of course) is the quality of the microphone that’s built into the camera.
I can’t think of a scenario where you’d be better off using any camera’s in-built microphone over a dedicated one.
These lighting and sound problems are actually really easy to overcome, though – the equipment you need to make them work for you is relatively inexpensive and adds a lot of production value.
The Must-Have Equipment You Need
Cheap lighting kits aren’t that expensive.
You can pick up a decent set of lights for under $ 100, or if you’re willing to splash out a bit more, you can get a backdrop included as well.

- A green screen backdrop opens a lot of doors for you from a technical standpoint, so it’s worth considering this, although it’s also possible to make one yourself – I’ll cover that in a second.
As with your camera, you don’t need to go overboard picking up the most expensive lighting kit you can find:
- You just want to be able to reflect some light around your ‘set’ a little to make things look a little more professional
- You need to properly light the face of the person who’s speaking so they’re not bathed in shadows.
Similarly microphones aren’t going to break the bank.
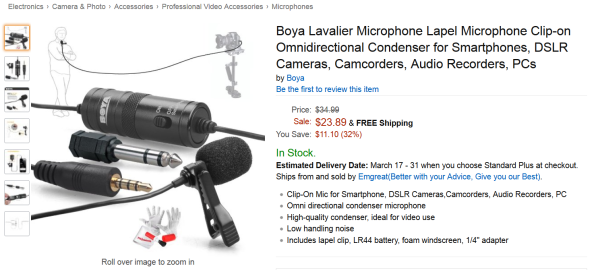
You’ll want a clip-on microphone – these are the kinds that TV personalities typically wear, and they hide comfortably on a speaker’s lapel.
Because they’re very close to the source of the sound (your mouth), you get much clearer audio from one of these than you’d get from a microphone inside a camera.
- This means you can be relatively far away from the source of the sound and still get the high sound quality you need to make your video sound fantastic.

Clip-on microphones come very cheap – for under $ 30 you can pick up the equipment you need.
I would seriously recommend getting a microphone with a typical headphone jack for its output:
- This makes it much easier to plug your microphone into a wide range of devices.
If the camera you’re using doesn’t support external microphones because you’re using something cheap to film, you can even plug clip-on microphones into your smartphone and record audio through an app.
- If you take this approach, though, be sure to use a clapboard at the beginning of each take
- The clap of the board (or a pair of hands, or anything else that makes a distinct bang) is used in filming to match up the audio with the video when the same device isn’t recording both.
Equipment-Free Alternatives
If you’re really not thrilled about investing in any fancy lighting kits or microphones, you’ll find your videos won’t have as much punch, but there are alternative options.
- To get the best possible light in your video, film somewhere with a lot of natural light – throw open the curtains, or if possible film somewhere outside in sunlight.
- A cheap alternative for decent sound is using the microphone in a pair of headphones or a hands free kit – it’s not the best possible audio, but it can work like a clip-on microphone in a pinch and it’s possible to clean up the audio (a little) in editing.
These alternatives aren’t great, but if you’re determined not to spend any money on slightly more professional equipment, they’ll make the best use of your situation.
Ultimately, the content of your video will keep people interested, so if you can’t produce something with solid lighting and sound, just make sure your message is decent and your video will be the best it can be.
Filming Your Video
Now we get to the crux of the matter: actually filming your content.

The specific ins and outs of how this goes depends on the kind of content you’re producing, but there are a few important points to consider:
- Your content shouldn’t be longer than five minutes total – perhaps in future once you’ve had more experience you can explore longer videos, but even then, most internet video content is short and sweet.
- It can take a while to get used to the camera, so be sure to practice plenty before you start filming, and record your video multiple times.
- Film your footage from several angles, making sure to get a few good close ups. These will help make your editing appear more natural.
- The more shots you can get, the more footage you’ll have to choose from – although this will also mean that editing will take longer.
Editing Everything Together
Once you’re happy with your footage, it’s time to take it into an editing program and cut it down to size.
There are plenty of editing programs available, and while some can be quite expensive, other programs are absolutely free.
If you’re looking for something particularly powerful and you’re not worried about price, there are plenty of options available such as Adobe Premier, but for a quick two hour video this will probably be too complex, so let’s look at some more basic alternatives.
Free, Quick and Easy
First off, there’s the editing software that comes pre-bundled with your computer.
iMovie
All Mac and iOS users have access to iMovie, and for beginner video editing there’s not much more you need.
You’re able to:
- Cut together footage
- Add in music and outside audio
- Insert graphics, text and other elements.

To be honest, when you start out you shouldn’t need too much more than this. If you are looking to learn more about this, there are plenty of tutorials and resource packs available online.
Windows Movie Maker
If you’re a Windows user, the Windows Essentials alternative to iMovie also lets you do all of the same things.
- It’s not quite as advanced, but a little practice can get you to a point where you’re making swish videos in no time.

Lightworks
If you don’t feel that either iMovie or Windows Movie Maker quite has the right feel for you, it’s worth checking out Lightworks.
This program is a free download and comes with a variety of settings and options, including color correction which might be very important depending on the environment in which you shot your video.
- Basically, if your video was shot under fluorescent lights the colors can end up behaving a bit strangely, and color correction helps you to take out the yellow tint you might spot in some footage.

Adding in graphics and other elements is fairly easy in this program – with a bit of practice you’ll be able to create high quality edits in no time.
Posting Online
Once you’re happy that your video has been fully edited, it’s time to post it online.
To get the most benefit out of your video, it’s important to put it everywhere you can, including:
- Your company website
- Social media platforms
YouTube is particularly important – the platform will automatically push people who are viewing similar videos towards your video, so it’s important to make sure people can see it.
To get the best exposure, you need to pay attention to your meta data for the video.
- This will mean that YouTube will know what types of videos are similar to yours, and will know when to recommend viewers watch your video so that you get the most coverage possible, and your video is seen by all the right people.

To make sure your video travels as far as possible on YouTube, it’ll need:
- A snappy title that grabs attention
- A well written description which thoroughly explains what’s going on in the video
- Relevant keywords that will help YouTube to know what kind of content is in your video.
It’s important to be as thorough as possible in filling in this data – especially the keywords. You should enter as many relevant keywords as you can possibly think of.
To help ad videos do as well as possible, YouTube provides a keyword suggestion tool – if you’re going to pay for advertising on YouTube, this tool can help you find keywords for all videos, not just paid ads.
Alternatively, it’s worth throwing in every possible word that could be relevant to your video – this will give YouTube more to go on as it seeks to pair up your video with recommendations for people who might want to watch it.
Getting Into a Rhythm
Once your video’s gone live, it’s time to start work on the next one.
I’ll be honest – with your first video, it might take a little longer than two hours to get into the swing of things.
- There’s a lot to learn and practice with, and you may want to experiment with trying different approaches to your video content.
That said, if you keep things nice and simple, it is possible to get everything completed in under two hours.
Beyond that, as you take the lessons you’ve learned from your first video, you’ll find yourself getting quicker at producing solid content, and you’ll be able to add in additional ideas and techniques for making more varied, interesting content.
At the end of the day, experimentation is part of the process of creating solid content, so as long as you keep trying new things, you’ll find the perfect system for making videos that works for you.
Got another tip to share when it comes to making brand videos? I’d love to hear it. Leave me a note below in the comments section with your best recommendations:
Images:
Pixabay, Flickr, Pixabay, Flickr, Pixabay, Flickr, Amazon, Amazon, Amazon, Flickr, Flickr, Flickr, Flickr, YouTube, YouTube, Pixabay.
Digital & Social Articles on Business 2 Community(71)
Report Post


