Maximize your digital marketing with Microsoft Clarity. Learn how to set up custom events and integrate it with GA4 for richer insights.

Microsoft Clarity is one of the best analytics tools you might not know about.
This powerful, free tool enriches your existing analytics and customer profiling, offering deeper insights into user behavior.
This article covers what Microsoft Clarity is and how to set up custom events to maximize its value for your website.
TL;DR
- Clarity is a free, no-frills heatmapping and user session recording tool. It adds color to your existing analytics setup and is an essential tool for digital marketers
- Seamless integration with Google Analytics 4 allows you to paint a deeper picture of your audiences and how they interact with your site.
- Clarity has good prebuilt filters, allowing you to segment out users and answer important analytics questions.
- Advanced segment building with Google Tag Manager event integration lets you track anything you want on your website.
What is Microsoft Clarity?
Microsoft Clarity is an analytics tool that provides heatmapping and session recordings.
Heatmaps provide a visual map of how users interact with your webpages, where they click most and how far they scroll down your page.
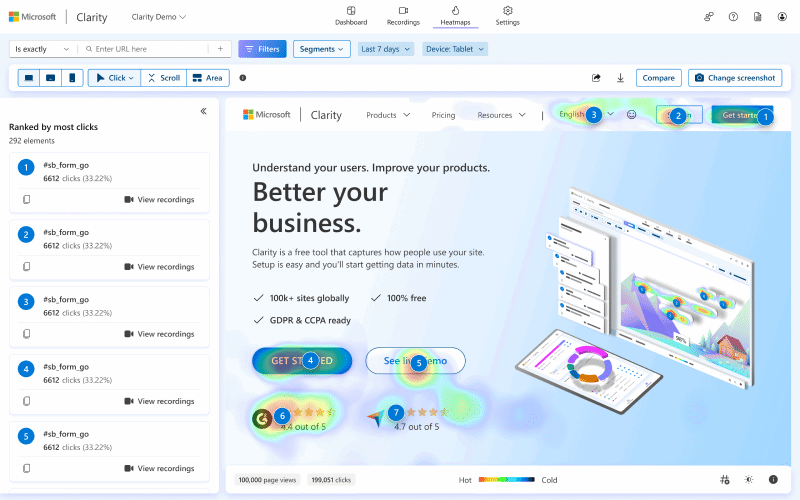
Session recordings are recordings of individual users’ device screens using your website. Clarity allows you to review different user sessions and see how people use your website.
Many tools, like Hotjar and Mouseflow, offer heatmapping and session recording software, often as part of more comprehensive UX solutions.
However, Microsoft Clarity stands out by focusing solely on heatmaps and session recordings, and it’s completely free.
This streamlined approach makes Clarity easy to use and highly appealing for those looking to get started quickly.
Leveling up your analytics
Analytics tools like Google Analytics 4 (GA4) provide a wealth of user data, but they do not tell the full story of how users interact with and use your website.
GA4 is useful for tracking how users reach your website, what devices they use and how they engage with it.
We can see metrics like button clicks, average time on site and top-visited pages. But there are nuances and bits of information missing in between.
Clarity can enrich this data. It’s like moving from black and white to a color picture.
Where previously you could understand which pages get the most views and which events triggered, now you can actually see:
- How users move through the pages.
- Where their mouse gets stuck.
- When they pause to take a minute to consider.
And so much more.
Clarity is not just an analytics or UX tool; it should be considered a part of the digital marketer’s basic toolkit.
For instance, when running a PPC campaign, its success is only as strong as its weakest link.
You could create a highly targeted Meta campaign with great creative assets, but it will still fall short if the landing page lacks the right flow or clear calls to action.
Microsoft Clarity provides the insights needed to ensure consistency across the entire campaign, from targeting to conversion.
GA4 integration
Clarity has four key sections:
- Dashboard.
- Recordings.
- Heatmaps.
- Google Analytics.
All these sections are straightforward to explore and use. Here, I’d like to focus on specific ways to use Clarity to get the most out of it.
A key part of Clarity to utilize is the Google Analytics reports.
There is an integration between Clarity and Google Analytics which needs to be set up first. This is found in Settings and under { } Setup in the sidebar.

This becomes extremely useful as it allows you to delve deeper into pre-existing GA4 segments. Once you select a particular segment in the GA report, you can review these user sessions.
In the GA report screenshot below, I’ve focused on a key referral source: chatgpt.com, which has recently been driving significant traffic to my site.
With Microsoft Clarity, I can now review session recordings from these users to assess whether they are high-quality prospects.

The same can be done for devices, pages and countries based on Google Analytics segments.
Powerful segmentation
While browsing Clarity’s reports and heatmaps can be interesting, it’s only useful when you start with the right questions.
This is where segmentation comes in. This is one of Clarity’s strengths, thanks to its powerful built-in filters.
For example, I noticed that weekend traffic to my site is high, but conversions are low.
To understand why, I can use Clarity’s filters to isolate weekend traffic, creating a segment that allows me to analyze this specific audience in more detail.
I can make the following filter selections under User info: Last 14 days > Day of the week > ‘Saturday, Sunday’

Along the top bar, we see that I have built a segment of users (I can also save this as a segment for future use).
All my reports in the dashboard, user sessions and heatmaps are now filtered to this segment of users.

I can now investigate what is happening on weekends through heatmaps and session recordings.
Clients often ask me, “What do users typically do before converting? Is there a trend we can improve on?”
While Google Analytics provides previous page paths, it can be difficult to interpret since visitors often navigate the site in a non-linear way.
With Microsoft Clarity, however, you can create a segment for all converters and leads, allowing you to watch their user sessions up to the point of conversion.
I spend considerable time analyzing these sessions to identify common patterns among purchasers and leads.
To do this, we can build a segment where users have reached a custom URL. This could be a thank you page on a form fill or a checkout thank you page.
Below, I have set one up using Clarity’s built-in filters, where the page URL contains “thank-you.”

The same approach can be applied to ecommerce sites with an “add to cart” feature.
You can easily review customers who added a product to their cart but didn’t complete the purchase by filtering for users who visited one page but didn’t reach the next.
See the example below:

Building custom events with GTM
Prebuilt filters are great, but they are limited. There are many instances where you will want to track specific items and actions on your site that are not available out of the box.
Google Tag Manager (GTM) allows you to tag and track a wide variety of events. We can then send these events into Clarity as “smart events” and use them to build custom segments.
This feature allows you to create any event in GTM, send it to Clarity, segment session recordings and gain deeper insights.
Here’s a step-by-step guide to setting this up. (In this example, we’ll track affiliate link clicks, but the process can be applied to any type of tracking.)
Step 1: First, define the question to plan the events you need to track.
In this case, I want to gain a deeper understanding of users clicking on affiliate links and how they interact with website articles before clicking out.
To do this, I need to create an event every time a user clicks on a link to the affiliate target.
Step 2: Connect Clarity and GTM by navigating to Settings > { } Setup.

Step 3: Create the GTM tag within your GTM account. Navigate to Tags > New.
Click to add a new tag type. In the sidebar, you’ll find premade tags for Microsoft Clarity.
I added the “luratic” tag, but any of the Clarity tags should work OK.

Step 4: Configure the tag by adding the Clarity project ID, which can be found under Settings > Overview.
See the orange box in the screenshot below. This tells GTM to push the event into your Clarity account (when triggered).

Add the project ID to the GTM tag configuration, as shown in the first red box.

Under Advanced Options, tick Add Custom Events, then add the event name (see the orange box above).
This event will be created by GTM and sent to Clarity. Choose a descriptive name for it.
Step 5: Add the trigger, which is the action on the website that will initiate this tag to fire.
Click on the Trigger Configuration box to select a trigger option.
In my case, I selected a trigger for “Click – Just Links.” This fires when someone clicks a specific link.
Next, define the conditions. You could enter any text in the URL of a third-party website you’re sending traffic to.
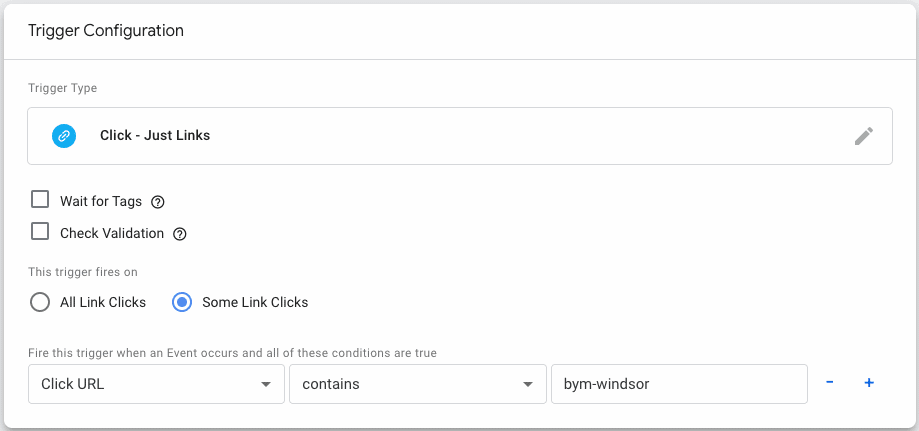
In this example, I want the trigger to activate only when the URL contains the text “bym-windsor.”
Now, whenever someone clicks a link with “bym-windsor” in the URL, this tag will fire and generate the event.
Note that there are many different options for triggers that are worth exploring. Triggers can include elements clicked on the page or pages on a website loading or many other options.
Step 6: Save the tag and publish the GTM container by clicking the Publish button on the top right.
Step 7: You now want to find your new events inside Clarity.
I recommend manually triggering this event by clicking on it on your website and waiting 24 hours to give enough time for this data to be pushed through.
Open Clarity and navigate to Settings > Smart Events. Here, you should see your new event from GTM come through as an API event automatically.
You now have a new smart event, which you can use to build a segment.
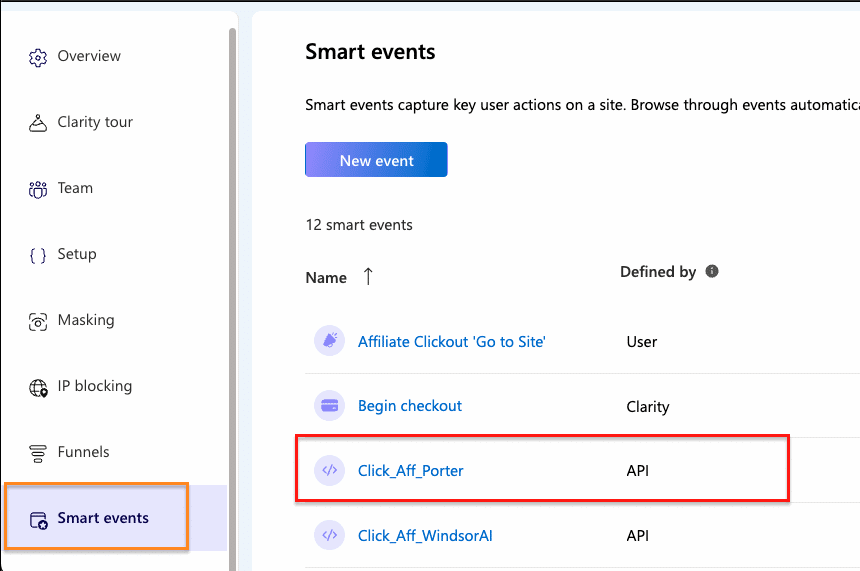
Step 7: Create the segment. In Clarity, open your filters and navigate to User actions > Smart events.
Select the event you have generated in GTM.

Step 8: The goal is to deepen your understanding of this particular group of users.
Over time, you can refine this segment further, drilling down into more specific categories.
Perhaps you want to determine whether they originated from a Meta campaign, whether they are nighttime visitors and whether they use mobile or desktop devices.
Transform your website analytics with Microsoft Clarity
It’s not often you come across a gem like Microsoft Clarity. It will help you paint a colorful picture and better understand your users.
The key to Clarity is in your approach. Start with the right questions, build custom events, use segments and gain deeper insights.
The post How to use Microsoft Clarity for deeper website analytics appeared first on MarTech.
(4)
Report Post
