In our previous posts, we looked at What is Kanban and Why is it Used and Getting Started with Kanban.
In Part 3, we are going to drill in on a few special topics: Limiting Work in Progress, Blocked Work Items, and Establishing Lanes of Service.
1. Limiting Work in Progress in Kanban
Limiting Work in Progress (WIP) is a powerful and essential part of Kanban. If you don’t take steps to limit the work in progress in Kanban, you could argue that it isn’t really Kanban anymore.
As a quick aside, most popular agile frameworks take steps to limit WIP. For example in Scrum, the timebox of the sprint is a way to limit WIP.
Why do we want to limit WIP? There are a few great reasons to limit WIP:
- We are able to deliver value faster
- Limiting WIP prevents overloading and keeps work flowing smoothly
- By focusing on fewer items and reducing context switching, people are more productive
- It helps us to spot and remove bottlenecks and inefficiencies
WIP Limits Help Us Deliver Faster
Faster delivery sure sounds attractive? Delivering faster is easy to do if you do one thing and focus on fewer items at the same time.
Let’s take a non-Kanban example. My wife is a personal trainer. I know what you are thinking, if that is true, why are you so out of shape. Let’s put that aside for the moment.
If you spend any time with a personal fitness trainer you will find that they have dreamed up many grueling and merciless ways to beat you up under the guise of training.
Three of their favorites include flipping tractor tires, pushing heavy sleds, and carrying heavy bags of sand.

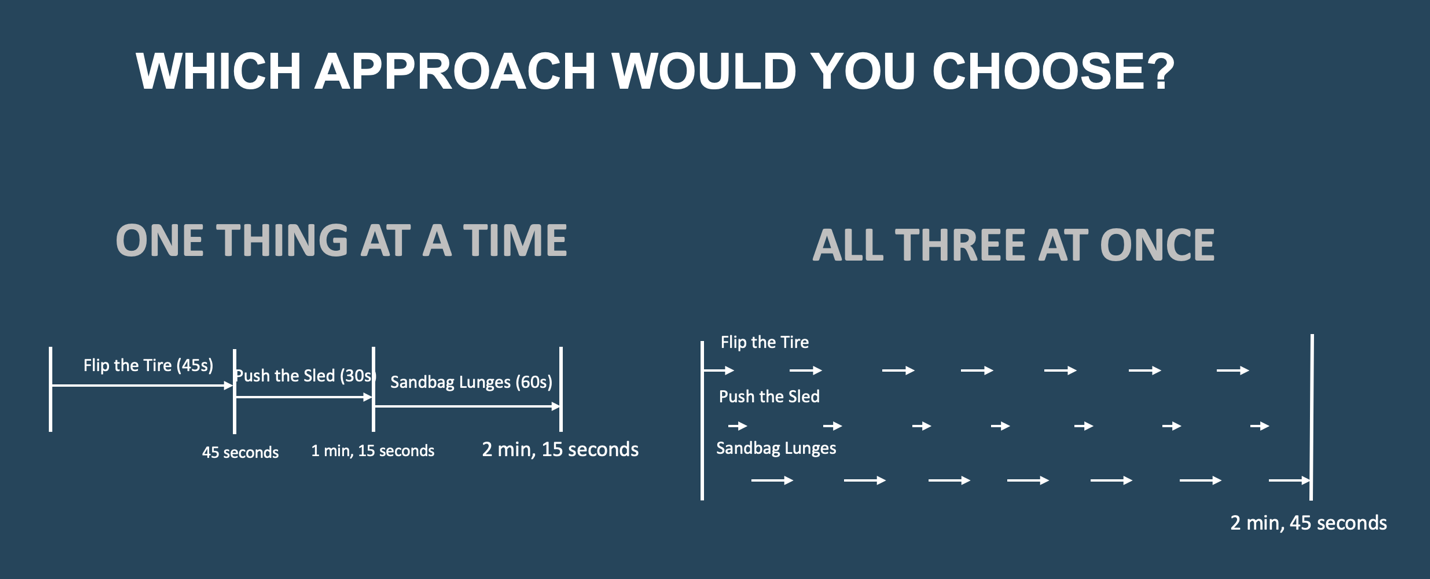
Imagine that you are going to do all three of these exercises. You can either do each of them from start to finish, or alternate between the three. Let’s look at a possible timeline for each approach, starting with one activity at a time.
One Exercise at a Time

Notice that doing one completely and finishing it resulted in 45 seconds for the tire, 30 seconds for pushing the sled, and 60 seconds for the sandbag lunges for a hypothetical total of 2 minutes and 15 seconds total. Not bad, if you are into that sort of thing. That is if you don’t take a huge break in the middle, as I would do.
Now let’s look at what might happen if you did all three at once.
All Three Activities at Once

When doing all three exercises at once, alternating between them, the time extends to two minutes and 45 seconds. Why? And why is it a big deal?
Well, it’s actually not such a big deal if you are just working out with a personal trainer. It is just going to take you longer. (You might be able to catch your breath even!)
But it might be a big deal if there are incentives tied to any of those 3 activities. What if your personal trainer, in an attempt to motivate you, bet you $ 100 that you couldn’t flip the tire in under a minute.
Would you still work on all three activities at once, or would you focus on one thing at a time starting with the tire?
Once we have attached economic value to completing an activity, the picture changes.
All our potential deliverables in Kanban have possible economic value and rarely is the value the same.
Imagine that instead of flipping tires, you are building features that have been requested by a customer. And that you get paid every time a feature is delivered to the customer and they accept it. Wouldn’t you want to deliver as fast as possible?
As you can imagine, alternating between the three deliverables is going to slow down the delivery of all three items. And significantly delay the feedback.
This is a simple example with only 3 items being worked on at the same time.
Little’s Law
There is a direct relationship between the number of things being worked on at the same time (WIP) and the cycle time or time that each item spends in the system. That relationship, called Little’s Law, is shown below:

Let’s look at an example. Let’s say that you are working on 10 items at the same time, and you normally complete 5 items per day. That would mean that each item spends about 2 days in your system. That is your cycle time.

If you don’t change the workers or the speed at which they work, but you only change the number of concurrent items, look at what that does for cycle time.

Again, we aren’t changing the people or how they work, just limiting how many items are being worked on concurrently. By cutting the number in half, we are able to cut our cycle time in half. It may seem counter intuitive but to cut the time to deliver each item, work on fewer items at the same time.
And cycle time is really important. In addition to the steady stream of deliverables that add value to our customers and which we can get paid for, it is a key part of both Agile and Lean Principles.
Agile Principles:
There are 12 Agile Principles that are part of the agile manifesto. Delivery to customers is specifically called out in two of those principles:
#1 – Our highest priority is to satisfy the customer through early and continuous delivery of valuable software.
#3 – Deliver working software frequently, from a couple of weeks to a couple of months, with a preference to the shorter timescale.
Lean Principles:
Delivery to customers is one of the 7 Principles of Lean Software Development as popularized by Mary and Tom Poppendieck.
#4 – Deliver as Fast as Possible
The more time between the customer request and the satisfaction of that request, the higher the likelihood that the customer’s need will change; nullifying or negating the work that has already been completed.
Limiting WIP Prevents Overloading and Keeps Work Flowing Smoothly
Another way that WIP limits help is to prevent overloading the system. There is a point where system performance and bottlenecks don’t share a linear relationship.
If you have ever sat through a traffic jam you have probably experienced the non-linear impact that bottlenecks tend to have on system performance. I live in Chicago and we have these types of traffic jams all the time.
Perhaps you waited through a traffic slowdown or stoppage that had no obvious cause. You may have crawled along or were stopped completely. As you move forward, you would expect to see a car stopped or an accident, and then when you approach the spot where traffic was stopped, there is nothing! This is called a phantom delay and it happens all the time in knowledge work.
To avoid the overloading of highways, organizations responsible for highways and traffic use ramp metering lights. The ramp metering lights limit the WIP of cars on the highway so that traffic keeps flowing smoothly.

Keeping the work flowing smoothly also helps reduce variance and improves predictability.
WIP Limits Reduce Multitasking and Increase Productivity
The third benefit of WIP limits is to reduce multitasking and context switching. As humans, we are unable to work on more than one thing at the exact same time. Instead, we do something called fast-switching. Fast-switching is when we stop doing one thing and then we start doing something else. We transition.
Fast-switching has a cost in terms of time and mental effort. We already saw how difficult it is to switch between three different exercises in the gym. What about knowledge work which can be harder to see?
You can actually demonstrate this for yourself with a simple multitasking exercise.
Exercise 3.1: Multitasking Demonstration
You will need a sheet of paper, a pen or pencil, and a count-up timer.

- Draw 4 lines on the sheet of paper with plenty of space between them as shown above. Number the lines one through four as shown.
- On the first line, you are going to time yourself writing “Multitasking is Tough”. Start your time, write the phrase and record the time.
- On the second line, time yourself, in the same way, writing the first 19 numbers: “1 2 3 4 5…19”.
- Add up the times from lines one and two.
- Now, you are going to do those two activities together, alternating from one to the other. So start your timer and write “M” on line three, “1” on line four, “u” on line three, then “2” on line four and so on until you finish with “h” on line three and “19” on line four. Don’t forget to stop your timer.
Record your results and compare your performance on lines 1 & 2 vs. lines 3 & 4.
[End of Exercise]
The cost of multitasking has been known for decades. Gerald Weinberg included the concept in his 1991 book, Quality Software Management: Systems Thinking. Gerald Weinberg is a software development expert and thought leader and he created the chart below to show the cost of working on too many projects at once.
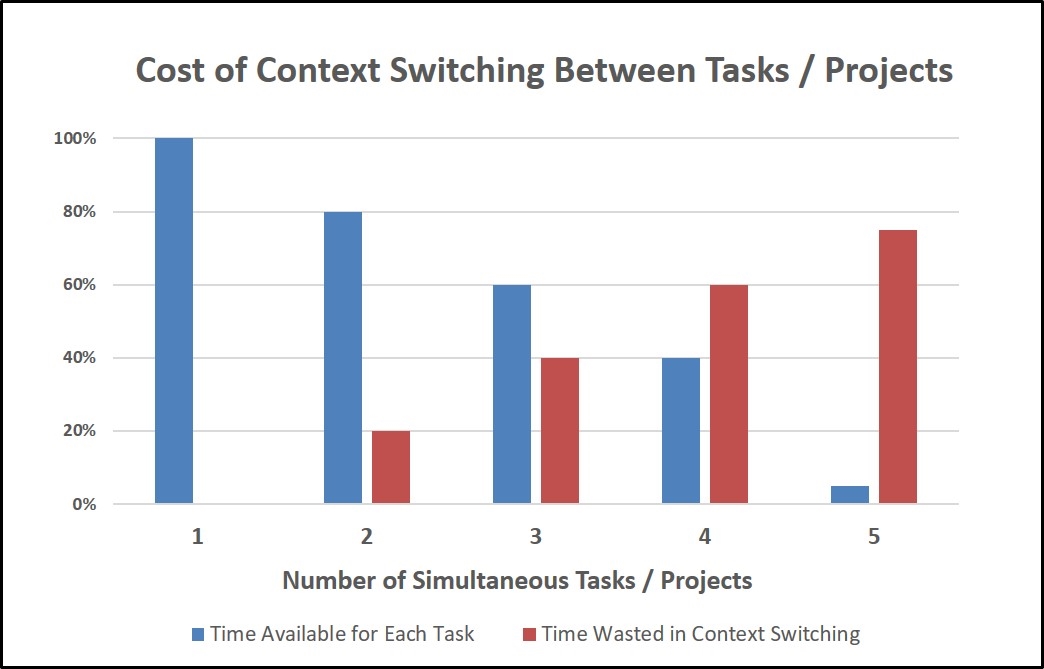
Weinberg estimated that the cost to switch between two activities is about 20%. That is, if you work on 2 projects at the same time, 20% of your mental effort is going to be consumed by the overhead of switching. With 3 projects, 40% of your mental effort goes toward switching and only 60% is able to be dedicated to the tasks you are trying to complete.
By the way, the cost of multitasking in the US alone is estimated to be $ 650B. That is a non-trivial amount!
Limiting WIP Helps Us Spot Bottlenecks and Inefficiencies
The fourth and certainly not the least important reason for limiting WIP relates to another Kanban Principle – making work visible. A lot of Work In Progress in a system can cover over a multitude of sins. When we lower our work in progress, we begin to see that there are unnecessary delays and inefficiencies that were otherwise not visible. This allows us to focus and really understand what is limiting our productivity.
Toyota used this insight to drive continuous improvement in their manufacturing process by reducing inventory. By lowering inventory levels, they could spot bottlenecks and inefficiencies. They likened the reduction of inventory to lowering the water level in a river to make the rocks visible. Using Just In Time inventory practices, they made quality problems visible.
And so it goes with your team efforts. The more work in progress you have, the more potential there is for hidden waste and inefficiencies.
How Do We Set WIP Limits?
With the simplest of Kanban boards, it may be impractical to limit WIP. The only way to limit WIP when you are using Not Started, In Progress, and Done is to set a limit on in progress. That may or may not be helpful to your team.
WIP limits are more applicable when you have broken out the multiple steps in your workflow and you have multiple people working on items.
So where do you start? A rule of thumb for a starting point for WIP limits is to have a total WIP of between 1-2 items per person. That means if you have a team of 6, your starting point for WIP across the team should be 6 to 12.
Don’t spend too much time debating the initial settings for WIP limits. Choose a starting point and move on. Once you get started, you can adjust the rate based on what you see. If people are frequently idle, you may have set the WIP too low. If tasks are frequently idle and people are very busy, you may have set it too high.
Let’s look at popular ways of setting those WIP limits.
Limit WIP by Column or Workflow Stage
The most common way to limit WIP is to limit the amount of work in each step of the workflow. This practice will help team members focus on the overall end-to-end process.
For example, see below for a simple workflow with 3 main steps – A, B and C. This board is shown with no WIP limits.
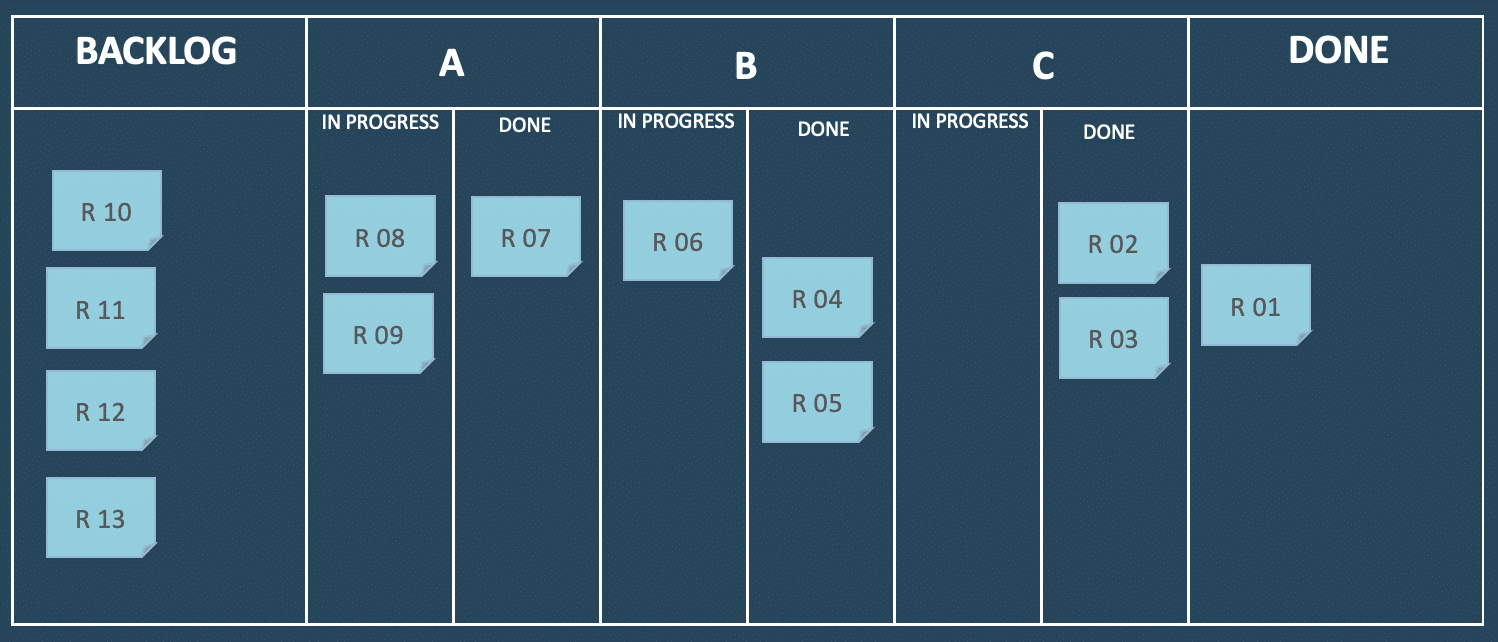
Without visible workflow and WIP limits, it is common for people in step A to only focus on step A and not pay attention to what is happening either upstream or downstream. If there is a bottleneck in step C or B, and A keeps on producing output, a queue will begin to grow. Unless A is taking the big picture view, all the work they do will become backlogged at their step and no true value will be delivered to customers.
So let’s add some WIP limits to that board. We will set A as 3, B as 3 and C as 2.
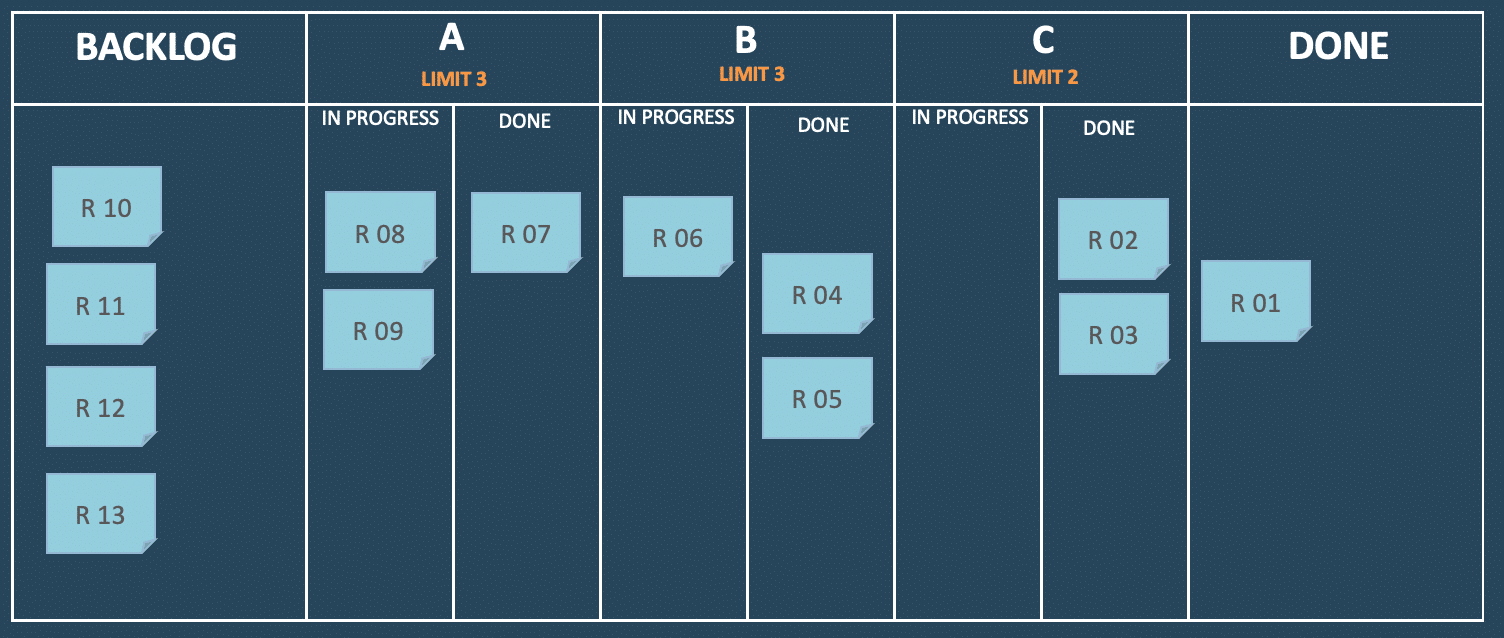
WIP limits at the column level will usually include both the items being worked on AND the work items that were completed at that step. In the case above, that means that both “In Progress” and “Done” for column A are included in the WIP limit of 3.
Limit WIP by Person
Limiting WIP by person is another way to constrain overall Work in Progress. This is most often accomplished with avatars.
An avatar is a physical or electronic token for each team member. The most commonly used avatars in Kanban are those from South Park though I have seen lots of other types.
In the example Kanban board below, there are 2 South Park avatars for each person. That means the WIP will be limited to 2 items per person.

For this to work, the team needs to agree that no work item can be moved to in progress unless someone puts their avatar on it. People will be constrained from starting more work by the physical avatars.
Caution – WIP Limits Might Be Unpopular
The thing about WIP limits is that they can be counterintuitive. In many organizations, they want everyone to be 100% utilized. Some leaders also erroneously believe that the best way to get a lot done is to load people up with work. They want everyone working to their full capacity.
These are the same managers that have 20 top priorities and that set aggressive timelines, knowing teams won’t hit them but believing that setting aggressive deadlines is the best way to inspire people to deliver faster. Never mind that it doesn’t work.
When these managers hear that you are limiting Work in Progress, they just might flip. How will we keep everyone busy they lament? What they are missing is that it matters little how busy people are. What matters is delivery or getting things all the way to Done. If they want to get more things to Done, they need to work on fewer items at the same time.
2. Handling Blocked Items in Kanban
It may not surprise you to learn that the majority of the cycle time for an item is time when no one is actively working on that item. If we want to improve our cycle time, we need to focus on items that are not actively being worked.
In most companies, the problem is that, from the portfolio level down to the team level, what is being worked on is not transparent. Furthermore, the awareness of understanding the difference between active and inactive work is missing. The focus is always on trying to speed up the work, but no one thinks about working on optimizing the waiting time. By using visualization on the Kanban board, it becomes apparent where work is getting backed up, where work is being blocked, where work is being waited on, etc. With color alone, say with red column titles or red “block” stickers, you can illustrate the inactive work.
– Klaus Leopold, Practical Kanban
Blocked items are those items that cannot be worked on for one reason or another. The most common reason is that a specific person or team needs to do something. This could be making a decision, doing some work, or reviewing the item. Whatever the cause, that other person is not doing the work needed to progress the item.
That person or team that is needed may be working on other things, and they will get to it later. It may be the legal team that is known for taking 90 days to complete a review. (This happened to me at a client once.) The item may be blocked because the only tester working on items is on a 3-week vacation.
The item could also be blocked because we aren’t sure who needs to do something or how to proceed. Sometimes when the going gets tough, a team member will shove the item off to the side and pick up something easier to work on.
As you can imagine, blocked items in Kanban system are a problem. They wreak havoc on metrics and predictability. They cause weird behaviors. They slow things down and gum things up. So how do we treat blocked items in Kanban?
Let’s look at how to represent blocked items on your Kanban board, then dive in to ways to deal with the blockages.
Showing Blocked Items On Your Kanban Board
There are two common ways of showing blocked items on the Kanban board – with a signal on the card, or by moving the card into a “blocked” position on the board.
The example below shows a blocked symbol on the card. Items R 09 and R 06 both have a clearly visible red “blocked” indicator on them.
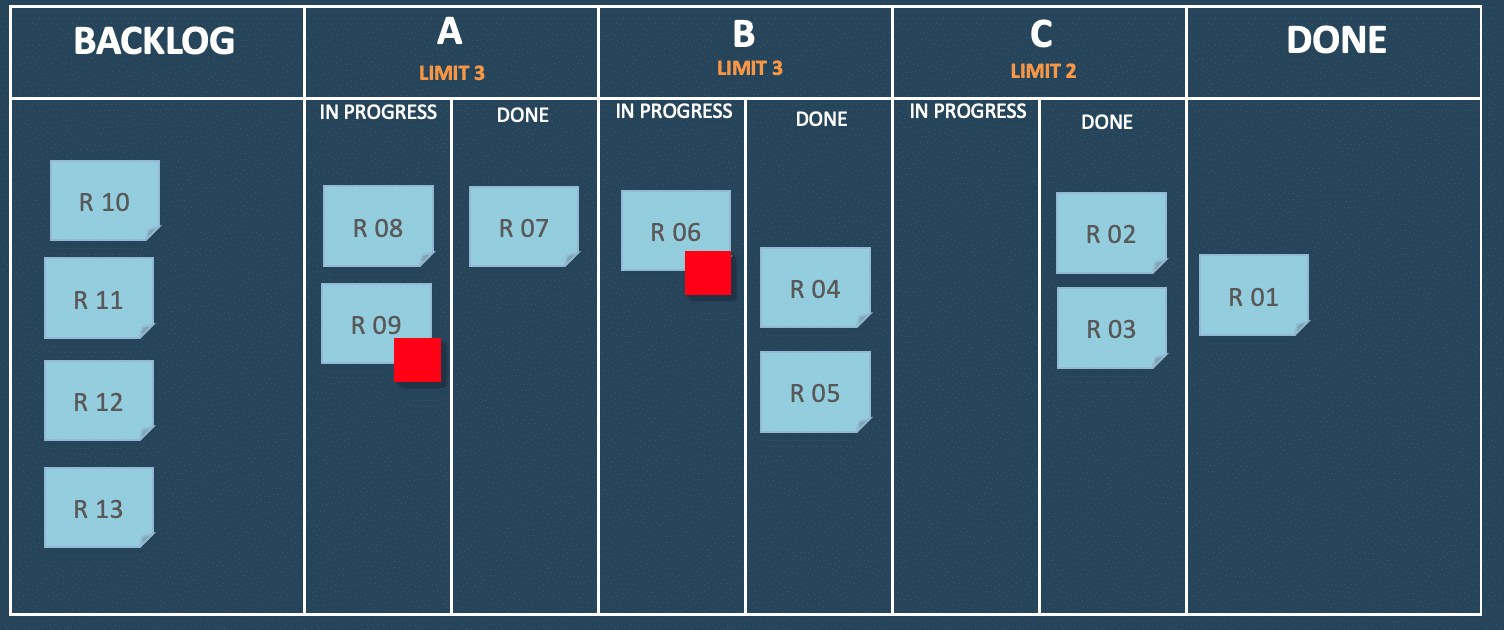
Indicating blocked items in this way makes them highly visible. And since the WIP limits still apply to the blocked items, the team will be incented to take steps to address the blockage, rather than ignore it.
An alternative approach is to have a place on the board where blocked items are moved. Some teams have a column where they put items that are blocked while others use space at the bottom of their column as shown in the example below.
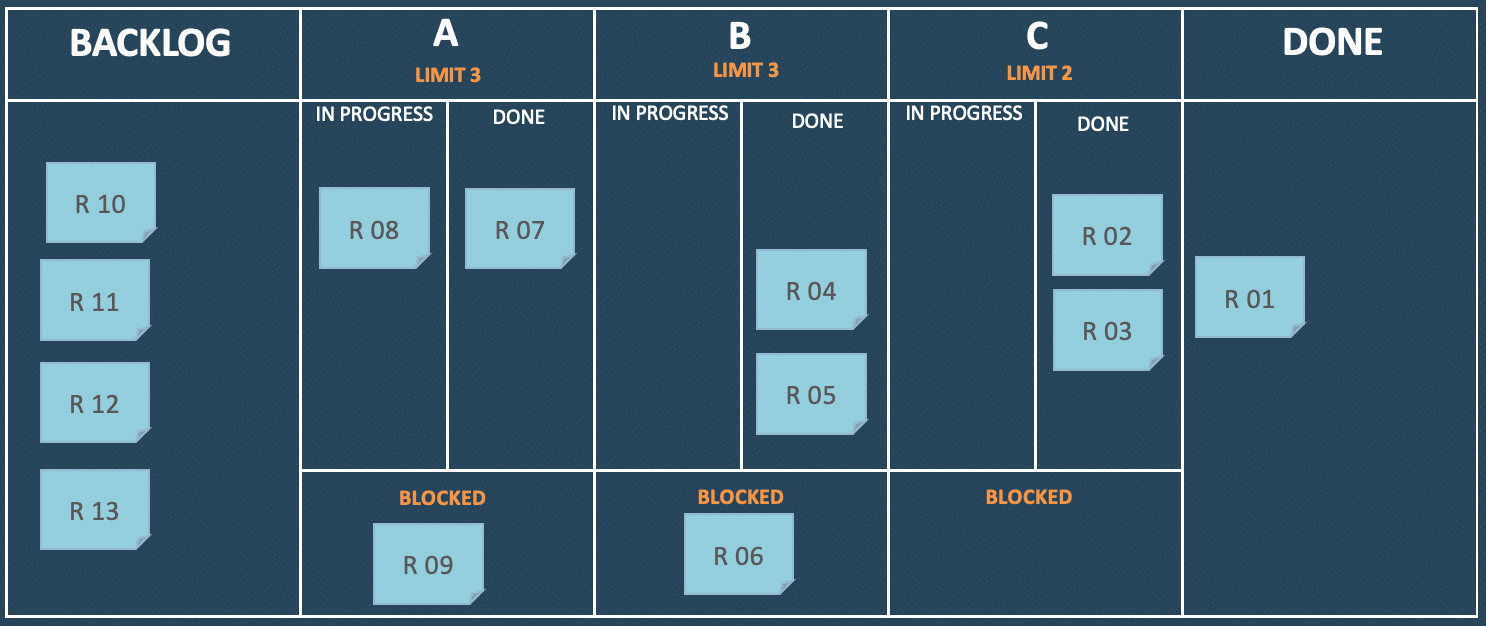
Moving the blocked to the blocked position may or may not free up the WIP limits. In the case shown above, item R06 does not count against the WIP limit of 3 for column B. For this reason, I prefer the previous approach to show a blocked indicator on the item and I prefer that those blocked items count against the WIP limits.
Blocked Items Reveal Insights
There is a silver lining to blocked items. They provide information about your system and clues as to why things take so long to complete.
For this reason, it makes sense to dedicate some time to the analysis of the blockers on a regular basis. Monthly seems to be a good interval. Take all the blocked items that have occurred and use affinity mapping to group them by similar root causes.
Let’s say that you had 9 items that were blocked over the course of the previous month. When you looked at them, you found that:
- 4 items were blocked waiting for a decision
- 2 items were blocked waiting for legal review
- 2 items were blocked due to changing customer requirements
- 1 item was not actually blocked, it was just that no one worked on it
Graphically it might look like this:
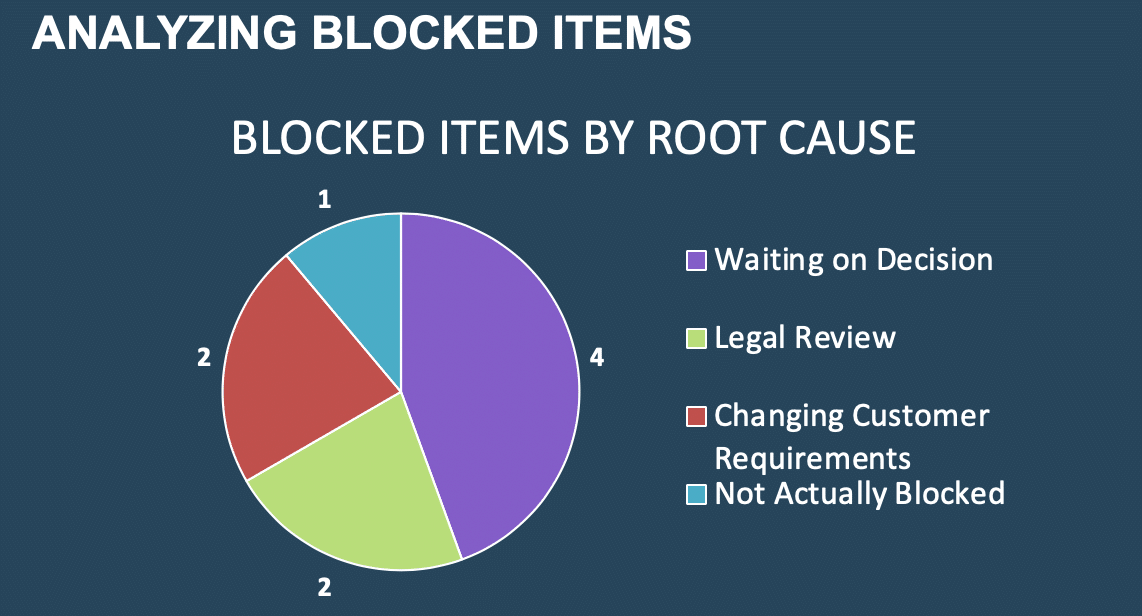
For this simple example, it is easy to see where to focus – the root cause that occurs the most frequently. In this case, it is those items waiting for a decision.
The team can look at ways to speed decision making, clarify responsibilities, and even seek empowerment.
The points is, understanding the root causes of the blocked items can provide insights into ways that the team can improve and ultimately speed up their delivery.
3. Lanes of Service
Finally, let’s talk about something called lanes of service. Many teams need to handle work items that have different priorities.
Imagine that you have an e-commerce website and your team uses Kanban to handle requests for both new features and critical defects in production. Which do you work on first? Most would agree it is the critical defect that should be handled first. By creating separate lanes of service, they can easily show the difference in priority.
The severity of requests is one type of priority. You may also have different priorities based on the requestor, the customer, the value of the item, or any other attribute.
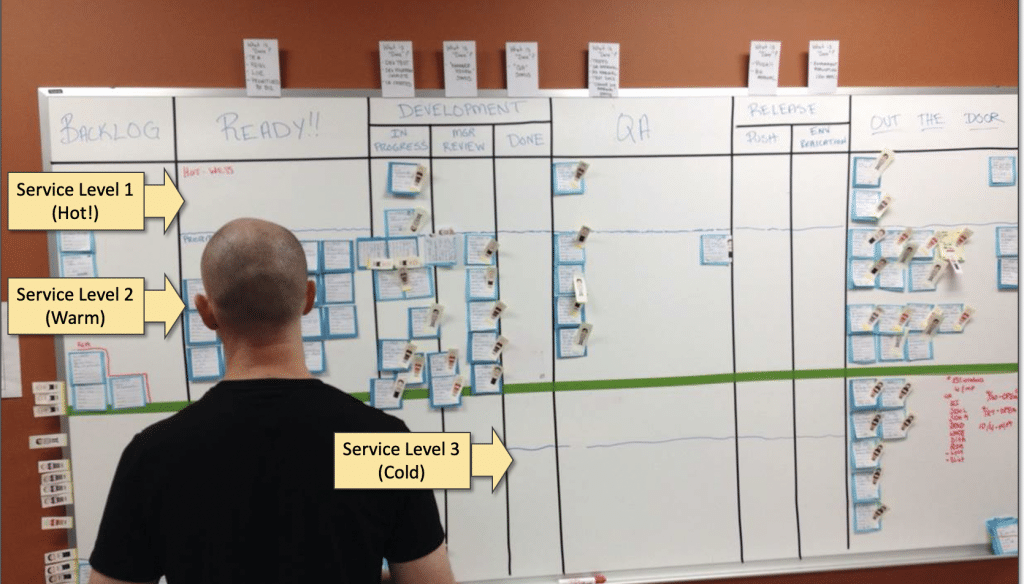
The typical way of handling these requests that have different priorities is to create lanes of service. A typical Kanban Board will have 2 or perhaps even 3 lanes of service. Items in the priority lane get attention before those in the other lanes.
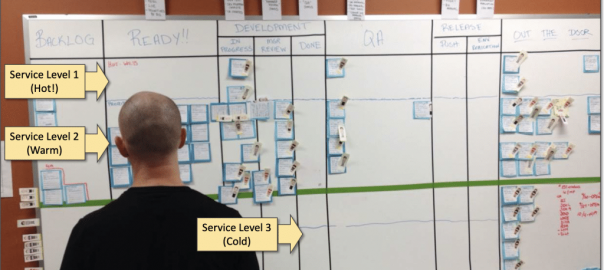
Take a look at the example below which is an actual Kanban board for an application development team. I’ve added labels on the board to show 3 lanes of service indicating different priorities. Those items that are on the top lane get the highest priority and are “fast-tracked”.
Summing it Up – Special Topics in Kanban
Kanban is super easy to use to organize your work. Many teams find it helpful to add a few advanced topics like limiting Work in Progress, reflecting blocked items, and adding lanes of service for work with different priorities.
This article was originally published here.
Business & Finance Articles on Business 2 Community
(51)
