— February 13, 2018
How to Take Good Instagram Photos
With just a quick scroll through Instagram, you’ll see tons of gorgeous snapshots filling your feed. Understandably, you’d like to achieve that very same thing for your own brand.
So, you do your best to step up your game with your Instagram photos.
But, the end results? Well, they always end up grainy, unfocused, and dark—your photos are nothing like the sharp and vivid images you know you need in order to make your account stand out.
You’re feeling frustrated and ready to throw in the towel altogether. After all, you aren’t a photographer—perhaps that means you’ll just never achieve the types of photos that you’re aiming for.
Not so fast. You absolutely don’t need to be an expert in order to craft some beautiful images for your brand’s Instagram feed.
With just some simple steps, you can score some attention-grabbing snapshots—without a photography degree or tons of expensive equipment.
Still not convinced? Have no fear—we have your comprehensive guide to taking good Instagram photos right here.
Why Do Good Instagram Photos Matter?
Of course, you know that stepping up your game with your Instagram photos will lead to a far more appealing presence for your brand.
But, beyond the vanity, why are good Instagram photos important? What do they really accomplish for you?
The important thing to remember is this: Instagram is a totally visual platform. And, the more visually appealing your photos are, the better they’ll engage your followers.
The more you engage your followers? The more you’ll boost that post according to Instagram’s algorithm—which then increases your chances of appearing in more people’s feeds and even landing on the “Explore” page (which will widen your reach to others who don’t yet follow your account).
Here’s another way to think about it: When you walk into a high-end clothing boutique, you expect to find well-made (and likely expensive) clothing items. It’s exactly what you went there for.
Similarly, users on Instagram are there for beautiful, high-quality images—not lackluster snapshots with zero thought or quality.
If you want to stay competitive, your photos need to warrant the attention of your followers.
How to Take Good Instagram Photos
Now that we’ve sufficiently scared you into thinking that you need to level-up your photography game, you’re probably wondering what’s next. How can you improve the quality of your photos—ideally, relatively quickly?
We’ve pulled together eight key steps that will take your Instagram photos from shoddy to stunning.
1. Map Out Your Aesthetic
Sure, your photos only show up one at a time in your followers’ feeds. But, when they click through to your profile? They’ll see all of your photos together.
You can think of your Instagram grid as a mosaic—it’s composed of individual images, but will have the strongest impact if each of those images fit together and create a somewhat cohesive appearance or vibe.
For that reason, your first step—before even snapping another photo—should be to think through what you want your overall Instagram aesthetic should be.
Keep in mind that your Instagram aesthetic needs to complement the overall personality of your brand. It shouldn’t be a jarring departure from the identity you’ve already fostered with your audience.
So, ask yourself what makes the most sense for your brand’s voice and style. Do you want something bold and colorful? Light and airy? Daring and adventurous?

Similarly, think about the types of things you’re planning on photographing. Will there be lots of shots of people? Or, will your feed involve plenty of food photography? Will you be shooting the great outdoors? Or, do interior shots make the most sense for your business?
Thinking through those things ahead of time will help you not only take good Instagram photos, but photos that actually contribute to your brand’s overall style and identity.
2. Invest Time in Preparation
Here’s the truth: It’s tough to take beautiful Instagram photos on the fly. Getting those jaw-dropping snapshots involves a little bit of luck, yes, but there’s also plenty of planning and preparation involved.
Now that you have the basics of your aesthetic ironed out, think of the groundwork that you’ll need to lay in order to achieve that look. For example:
- Do you need to purchase props to be included in photos?
- Should you scout locations that will make your images pop?
- Are there other supplies you’ll need—such as backdrops for flat lay photos?
- If you plan to use people in your images, who do you plan on photographing? Do you need to find willing models to participate?
If you answered yes to any (or all!) of those questions, take the time to get those things in order now. That way, you’ll be stocked, prepped, and ready to take the best photos possible—without a bunch of wasted time or frantic scrambling around to get your ducks in a row.
3. Understand Your Equipment
If you think you’ll need to invest a good chunk of your marketing budget into tons of lighting and advanced cameras, think again.
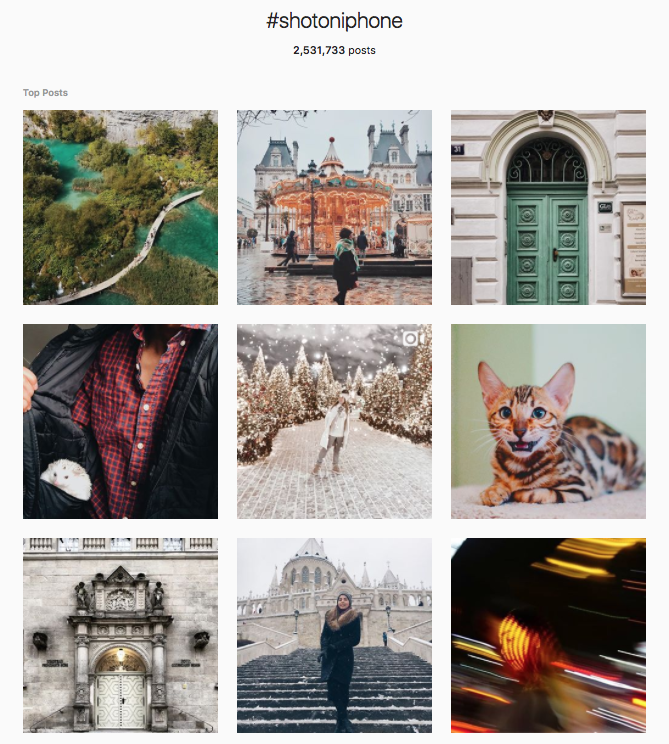
In fact, plenty of the gorgeous photos that you’ve seen on Instagram have been shot with nothing more than just a phone.
Just take a quick look at Apple’s branded hashtag #ShotoniPhone on Instagram, and you’ll see plenty of stunning images that were captured without any high-tech equipment:

However, despite the fact that you don’t need to invest in anything expensive or overly complex, it’s important that you do understand how to best leverage whatever it is you’re using—even if it is just a phone.
While most phones have user-friendly cameras, that doesn’t mean they’re totally elementary and basic. On the contrary—there are plenty of options for adjusting things like exposure and focus using your phone’s camera.
This can all vary depending on which specific phone you have. Your best bet is to search for some tutorials and then do some playing around to figure out what adjustments and tools work for you best.
Want more inspiration? Here are some additional resources that can help you:
Must-Read Tips for Taking Amazing iPhone Photos
How to Take Better Photos With Your Android Phone
Give those a read and you’ll be armed and ready with different hacks and tips to help you make the most of your phone’s camera.
4. Familiarize Yourself With Photography Basics
No, you don’t need to be an expert photographer to land some quality snapshots. However, those camera tricks, hacks, and features are really only going to take you so far.
If you really want to capture standout Instagram photos, it’s wise to familiarize yourself with some of the photography basics first.
That will help you at least start with a solid photo—which you can then polish up (more on that later!) and post.
Obviously, there’s a lot more involved with stellar photography than we could possibly touch on here. However, here are some things you’ll want to keep an eye on when shooting:
- Composition: The arrangement or placement of whatever subject or subjects are within your photo. The most common (and easiest for beginners!) approach to ensure a balanced image is is to use the rule of thirds.
- Negative Space: The area that surrounds the main subject of your image. Enough negative space helps to steer your viewer’s eye toward the element that’s most important—without too much visual clutter. In fact, Instagram images with a high amount of negative space generate 29% more likes than those with minimal negative space.
- Perspective: The most obvious method is to photograph your subject straight on. But, to keep your images interesting, try to come at your subject from different angles—whether that’s above, below, or from the left or right.
- Lighting: Proper lighting is oh-so-important for quality Instagram photos. So important, in fact, that we’ll dedicate the entire next section to it.
Here’s another important thing to note: If it helps you, shoot all of your photos in “square” mode.
Since most Instagram photos are square, shooting that way will help you see exactly what the composition will look like—as opposed to being disappointed when you need to crop it.
If you’re highly interested in finding out more in-depth information about various photography techniques, don’t hesitate to roll up your sleeves and dive right into all of the tutorials, how-to articles, or even classes that you can find!
But, if not? At least familiarize yourself with the above basics of what makes for a great photo. That step alone will help you see a major difference in your results.
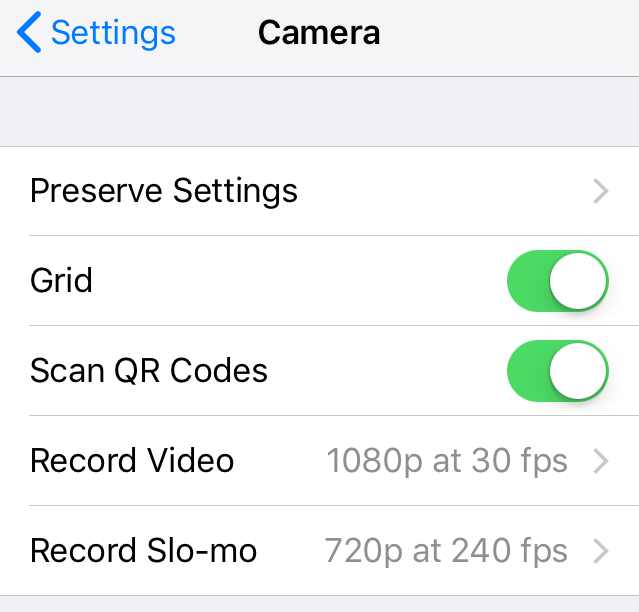
INSIDER TIP: Want to leverage the rule of thirds for more balanced photos? If you’re an iPhone user, head to “Settings” and then “Camera”. You’ll see a toggle for the “Grid Overlay.” Turn that on, and you’ll see a nine-square grid whenever you use your camera—which will help you easily use the rule of thirds to take awesome photos.

5. Consider Your Lighting
There’s no simpler change that will so drastically improve your photos than paying attention to your lighting.
Don’t take this to mean that you need all sorts of complicated lighting rigs and bulbs in order to capture a beautiful image—that couldn’t be further from the truth.
In fact, natural lighting is usually your best bet when it comes to photography.
You might think this means that the sun needs to be blazing in order for you to leverage natural light for your photos.
However, direct sunlight can actually be difficult to work with—due to the various shadows and glares that it casts.
So, if you are planning on shooting outdoors, look for some different spots that have open shade. You’ll still get the benefits of natural light, without those pesky issues that come from direct sunlight.
Don’t want to shoot outdoors? Rest assured, you can still use natural light to your advantage inside as well.
For example, position your subject near a window.
However, keep in mind that you may not want to shoot directly in front of that light source, as that will likely create a silhouette. Instead, open those blinds or curtains and let the light flow into the room in order to instantly improve the appearance of your photos.
Whatever you decide to do, keep this in mind: Even a tiny level of natural light will be your best friend when it comes to Instagram photos.
6. Take Your Time
Since Instagram is a social network, it’s easy to fall into that “rapid fire” mentality that seems to pervade all social platforms.
But, one of the best ways to capture solid images for your brand’s account is to take your time—particularly when you’re actually shooting photos.
When you’re clicking away on your camera, make sure to pause for a moment to look at the pictures you’ve captured so far. What do you like? What don’t you like? What can you change?
Then, try something new—whether it’s a different angle, layout, pose, or something else entirely. Granted, this is tougher to do if you’re photographing something fleeting (such as wildlife, for example).
But, if you can practice some patience and tweak and refine as you’re shooting, you’re far more likely to end up with an image that you’re happy with. And, even further, you’ll have dozens of different images—rather than ones that look nearly identical. That diversity will empower you to truly choose the best of the best.
7. Explore Your Editing Options
Instagram has some great filters and editing tools already built in. However, there are plenty of other third-party apps that you can utilize in order to truly achieve the look you’re going for—particularly if you aren’t able to do so using the options available only through Instagram.
The choices feel virtually limitless when it comes to editing apps and solutions. But, here are a few that are definitely worth checking out:
If you don’t think that venturing outside of Instagram to edit your photos can make a difference? Allow us to convince you.
Here’s a quick example of a photo that we edited using only the tools available in the A Color Story app. By simply adjusting the clarity, contrast, and then adding a “refresh” filter, we were able to transform this previously dingy and dark flat lay photo:

Into this end result that’s much brighter, cleaner, and far more striking:

What exact settings and adjustments you make to your photos will depend on what overall look you’re going for within your brand’s Instagram feed.
But, the point is this: Don’t trick yourself into thinking that Instagram’s tools are all that’s available to you.
There are plenty of other helpful solutions out there, and they might be just what you need to take your own photos up a notch.
Insider Tip: If there’s an Instagram feed that you really admire, reach out to that person to ask if he or she is willing to share the details of what apps or settings are used to edit those photos. You might be able to use their same tools and steps to achieve a similar vibe for your brand’s own feed!
8. Practice, Practice, Practice
As with anything, Instagram photography isn’t a skill that you’ll hone overnight.
It’s something that’s refined over time—after much experimenting and plenty of trial and error. Even with tons of advice at your disposal, it will still take some time to get things just the way you want them.
So, resist the temptation to get frustrated when things aren’t perfect yet. You’ll get there eventually with plenty of research and practice.
Even further, all of that time spent on experimentation with your photos will reveal what you do like and don’t like, as well as what’s working well and what isn’t.
That’s valuable information you can use to streamline your process and land on a winning (and repeatable!) recipe for great Instagram photos time and time again.
It’s Time to Start Snapping Those Photos
Ready to begin capturing amazing Instagram photos to post to your brand’s feed? You have plenty of tips and tricks to help you get you started.
With all of this information under your belt, we’ll leave you with one last piece of advice: Don’t hesitate to step back your posting schedule just a little bit in order to leave yourself time to capture the best images.
You’d rather post a few engaging and high-quality photos each week than post a shoddy photo each day—simply because you’re trying to meet a quota. Consistent posting is important. But, sometimes quality really does carry a little more weight than quantity.
In order to achieve that Instagram-worthy quality, put the tips and advice we’ve covered here to good use. Do that, and you’re well on your way to leveling-up your Instagram game. Hey, you may never be a professional photographer, but you’ll sure look like one on Instagram.
Digital & Social Articles on Business 2 Community
(68)
Report Post


